Pi-hole v6 for Raspberry Pi 3 Model B+
With WireGuard, Cloudflared, Monit, healthchecks.io, PADD and raspiBackup
Pi-hole philosophy

The Pi-hole® is a DNS sinkhole 1 that protects your devices from unwanted content, without installing any client-side software.
- Why? Because Advertising Makes Us Unhappy. After that, one can ask him/herself: Should I use an ad blocker?
- If the answer is yes, then one can expect faster web browsing, as advertisement and trackers are blocked on home network-level –> saves bandwidth.
- No need to run separate ad-block browser extensions -> saves resources.
- This makes the infrastructure simple, plus I only need to trust the block list maintainers 2.
- As ads are blocked on a network level, blocking takes place also on various IoT-devices, which otherwise couldn’t run adblockers (like smart TVs).
- Pi-hole achieves this essentially by being a “DNS sinkhole”. Since the DNS is vital piece of infrastructure, Pi-hole setup needs to be reliable, low-latency and easy to troubleshoot. Thus, putting anything else on this same raspberry pi 3 system is a risk, especially when installing on SD-card, as they tend to wear out and become corrupted 3.
- Alternative to Pi-hole is AdGuard Home which is only partially free and open source.
Hardware used
- Raspberry Pi 3 Model B+ (Or any, Pi-hole supported hardware will do).
- Kingston High Endurance microSDXC95R/30W C10 A1 UHS-I SDCE/32GB (Or any high-capacity well-known brand, like SanDisk Ultra 32Gb will do).
- 3.5inch Resistive Touch Display (B) for Raspberry Pi, 480×320, IPS Screen, SPI (optional, for PADD).
Preparation
This guide configures Pi-hole with interface being eth0 (ethernet cable). If you install with wlan, you can do that there’s no noticieable difference, but make the decision now and stick to that decision so you remember to take this into account when defining interfaces (lan or wlan) in this guide.
Change modem to “bridged mode” so that it only passes through the traffic in order to make port forwarding in your actual router simpler, see Elisa ISPs router instructions. Passing through the traffic (port forwarding) is needed if WireGuard setup is wanted.
Install Pi Imager. With it, write minimal (Raspberry Pi OS Lite) on the SD-card. See tutorial video of the write procedure if needed.
Pi Imager is capable of setting your:
- Hostname, identify your Pi on a network
- SSH on boot, useful for headless and remote projects
- WiFi, setup your WiFi without editing a config file
- Locale, set your language and location
If you prefer to do those steps manually instead of Pi Imager, here are the details:
Optional: Setting hostname, enabling ssh, setting pi user password, configure wifi and setting time zone data
Enable SSH:
Raspberry Pi OS images no longer have SSH enabled by default, but it’s easy to enable it. Open file explorer (win-e), ensure you have from under menu View File name extensions enabled (otherwise your file extensions will be with .txt-extensions). Then right click, New > Text Document, name it ssh (without any .txt-extension) onto the boot-partition of the SD card after you have written the disk image. Or,
- if on Linux, do
$ touch ssh, or, - if on Windows with Powershell, do
$ $Null | Out-File .\ssh
Then setup raspberry.
Set pi user password:
Note that ssh user and pass must be setup since April 2022. Create onto boot also a file called userconf. Define it with user:password hash, where the hash is generated by running:
$ echo "password" | openssl passwd -6 -stdin
Hashing password is needed only from Raspberry Pi OS Debian version 11 (Bullseye) onward.
: Notice the leading space in $ echo "password"-command. Otherwise your password will be saved into your bash history.
Raspberry starts when power cord is attached. Let it boot, then check its IP from router.
SSH into RPi3 from your host as a non-root user ($):
$ ssh user@rpi3.ip.from.router
and type in the ssh password.
Once in, change the rpi3 hostname. This is good practice to do in case we have multiple machines so we know which is which:
$ sudo nano /etc/hostname
Delete the old name and setup new name:
$ sudo nano /etc/hosts
Replace any occurrence of the existing computer name with your new one.
Reboot the system to changes take effect:
$ sudo reboot
(Optional): ssh is disabled by default on Raspberry Pi OS, so enabling sshd as per Raspberry pi documentation is a good idea as it easens the administrational tasks considerably (no need to hook up monitor, keyboard etc.).
$ systemctl status sshd
$ sudo systemctl enable ssh
$ sudo systemctl start ssh
$ systemctl status sshd
(Optional): Also, creating passwordless login for ssh as per instructions here is a good idea, as it it one of those rare security features that improves security and usability (by reducing password fatigue).
Configure the correct time zone. Date/time needs to be correct; otherwise none of the DNSSEC lookups will work:
$ sudo dpkg-reconfigure tzdata
Check the LAN-cable is connected and boot Raspberry by attaching the power cord. Let it boot then check its IP from router.
Change Raspberry’s IP to static by logging in to your router (in Asus RT-AC86U router go to: LAN - DHCP Server: Enable Manual Assignment: Yes). Select raspberrypi from the client’s list and bind it to some static IP. I bind it to 10.0.1.245 4.
SSH into RPi3:
$ ssh user@10.0.1.245
and type in the ssh password. You’ll see a warning message:
The authenticity of host '10.0.1.245 (10.0.1.245)' can't be established.
ECDSA key fingerprint is SHA256:l/LA0mZ8187cXSazV5b1nNvzRws6+5KfVAm5EJhrCgY.
Are you sure you want to continue connecting (yes/no/[fingerprint])? yes
Warning: Permanently added '10.0.1.245' (ECDSA) to the list of known hosts.
Ensure your user can log in also in the future SSH sessions. Add user to the ssh user group:
$ sudo adduser user ssh
Configure the system for a static IP:
$ sudo nano /etc/dhcpcd.conf
# Example static IP configuration:
interface eth0
        static ip_address=10.0.1.245/24
        #static ip6_address=fd51:42f8:caae:d92e::ff/64
        static routers=10.0.1.1
        static domain_name_servers=127.0.0.1
Uncomment the values for Example static IP configuration and input your own. Use 127.0.0.1 for static domain_name_servers as it is considered best practice.
Update : noticed after Pi-hole upgrade to V6 that /etc/dhcpcd.conf now consisted of:
interface eth0
        static ip_address=10.0.1.245/24
        static routers=10.0.1.1
        static domain_name_servers=127.0.0.1
interface wg0
        static ip_address=10.8.0.1/24
        static routers=10.0.1.1
        static domain_name_servers=127.0.0.1
On Debian OS 12 (bookwork) and later, dhcp is no longer used to set up the static ip, instead nmcli is used.
Save and reboot for new settings to apply. Then ssh to new ip 10.0.1.245. You can then also verify static IP and DNS by doing:
$ ifconfig
$ dig kapsi.fi
Leaving the default user pi, with the default password raspberry is a security risk. Add your own user:
$ sudo adduser pyyhttu
Adding user `pyyhttu' ...
Adding new group `pyyhttu' (1002) ...
Adding new user `pyyhttu' (1001) with group `pyyhttu' ...
Creating home directory `/home/pyyhttu' ...
Copying files from `/etc/skel' ...
New password:
Retype new password:
passwd: password updated successfully
Changing the user information for pyyhttu
Enter the new value, or press ENTER for the default
        Full Name []: Tuomas Pyyhtiä
        Room Number []:
        Work Phone []:
        Home Phone []:
        Other []:
chfn: name with non-ASCII characters: 'Tuomas Pyyhtiä'
Is the information correct? [Y/n] Y
Check groups user pi is associated to:
$ groups
pi adm dialout cdrom sudo audio video plugdev games users input netdev ssh gpio i2c spi
Add user pyyhttu to the same groups:
$ sudo usermod -a -G pi,adm,dialout,cdrom,sudo,audio,video,plugdev,games,users,input,netdev,ssh,gpio,i2c,spi pyyhttu
pyyhttu : pyyhttu pi adm dialout cdrom sudo audio video plugdev games users input netdev ssh spi i2c gpio
Reboot by doing:
$ sudo reboot
Wait couple of minutes for reboot to finish, then log in as the new user, and delete the pi user:
$ ssh pyyhttu@10.0.1.245
$ sudo deluser pi
Removing user `pi' ...
Done.
Now we will allow our new user to run sudo without providing a password. First, we delete the sudoers config for the user pi since we deleted that user:
$ sudo rm /etc/sudoers.d/010_pi-nopasswd
Then we make a new file for the new user:
$ sudo nano /etc/sudoers.d/pyyhttu-nopasswd and with content:
pyyhttu ALL~(ALL) NOPASSWD: ALL
Change permission for that file:
$ sudo chmod 440 /etc/sudoers.d/pyyhttu-nopasswd
Pre-installation tasks on Raspberry Pi OS, before installing Pi-hole
The following is optional. I prefer to do these steps as they help me to administer the rpi3 later on. If you don’t do them, that is fine, but note that you’ll then need to use apt instead of aptitude:
Optional: Setup aptitude, localepurge, deborphan, apt-listbugs and apt-listchanges for pinning
Get aptitude cfg file (including no-recommended installations):
$ sudo wget -c http://iki.fi/~pyyhttu/debian/aptitude/apt.conf /etc/apt/apt.conf
Install minimal version of aptitude (or continue using apt):
$ sudo apt update
$ sudo apt install --no-install-recommends aptitude
Install and run localepurge to get rid of locales that we do not use, as well as localized packages and man pages. Install and run deborphan that searches for orphaned packages, i.e., which are not required by any other package upon your system:
$ sudo aptitude update
$ sudo aptitude install localepurge deborphan
Install apt-listbugs and apt-listchanges packages:
$ sudo aptitude install apt-listbugs apt-listchanges
When installing new package versions or upgrading the packages, I’m made aware of grave-serious bugs (apt-listbugs) or important changes (apt-listchanges). I can then have apt-listbugs to pin the package so that the new buggy version is not installed. Every midnight apt-listbugs queries the Debian bug database to see if there are new bugs, and/or unpins the package if the bug has been fixed 5. These two packages save me from ton of unnecessary troubleshooting and downtime.
Short tutorial on pinning with apt-listbugs:
I’ve just executed
$ sudo aptitude update && sudo aptitude safe-upgrade
Upgrade prompts me there’s a “grave-serious” bug (#1032235) reported at Debian bug tracker for package libargon2-1. Inspecting the bug, I decide I want to stay for a while in the latest working package, thus I “pin” the libargon2-1 package by issuing p libargon2-1:
[...]
Need to get 0 B/47.7 MB of archives. After unpacking 157 kB will be used.
Do you want to continue? [Y/n/?] Y
Retrieving bug reports... Done
Parsing Found/Fixed information... Done
grave bugs of libargon2-1 (0~20171227-0.3 → 0~20190702-0.1) <Outstanding>
 b1 - #1032235 - cryptsetup: libgcc_s.so.1 must be installed for pthread_exit to work
Summary:
 libargon2-1(1 bug)
Are you sure you want to install/upgrade the above packages? [Y/n/?/...] p libargon2-1
The following 1 package will be pinned:
 libargon2-1
Are you sure? [Y/n] Y
libargon2-1 will be pinned. Restart APT session to enable
Are you sure you want to install/upgrade the above packages? [N/?/...] N
*********************************************************************
****** Exiting with an error in order to stop the installation. ******
**********************************************************************
E: Sub-process /usr/bin/apt-listbugs apt returned an error code (10)
E: Failure running script /usr/bin/apt-listbugs apt

Current status: 25 (-1) upgradable.
pyyhttu@raspberrypi:~ $
I then restart APT session by redoing
$ sudo aptitude update && sudo aptitude safe-upgrade
and upgrade is this time completed, without the now pinned libargon2-1 package.
Later, libargon2-1 has been fixed, so I do:
$ sudo nano /etc/apt/preferences.d/apt-listbugs
And delete the Package, Pin, and Pin-Priority lines, along with all the corresponding explanation lines, and relaunch APT session (update & upgrade). This is handy when running cutting edge releases in rolling releases manner, like Debian Sid. Benefits are, that I have always the newest package versions with latest features, but with some last line of defenses in place to avoid breaking my system.
But systems do break.
Especially volatile, development releases such as Debian sid, as not everything is captured by people reporting bugs.
What to do then?
Couple of options, usually in this order:
- Report the bug, and wait it out for the maintainers to fix the issue.
- Downgrade the broken package with apt to its previous version:
$ sudo aptitude install <package-name>=<package-version-number> OR to its previous target release:
$ sudo aptitude -t=<target release> install <package-name>.
See this thread for more info.
As an example consider this real life scenario that happened:
I updated with:
$ sudo aptitude update && sudo aptitude safe upgrade:
[...]
Fetched 632 kB in 2s (369 kB/s)

Current status: 64 (+6) upgradable, 73192 (-55) new.
Resolving dependencies...
The following NEW packages will be installed:
  libatk-bridge2.0-0{a} libatk1.0-0{a} libatspi2.0-0{a}
The following packages will be REMOVED:
  libatk-bridge2.0-0t64{u} libatk1.0-0t64{u} libatspi2.0-0t64{u}
The following packages will be upgraded:
  apt-transport-https libcairo-gobject2 libcairo2 python-apt-common readline-common
5 packages upgraded, 3 newly installed, 3 to remove and 59 not upgraded.
Need to get 820 kB/1,010 kB of archives. After unpacking 4,096 B will be freed.
Do you want to continue? [Y/n/?]
[...]
And everything was seemingly fine.
However, there wasn’t yet a bug reported that replacing libatk-bridge2.0-0t64{u} would break emacs which I found out by a chance during the same evening:
pyyhttu@raspberrypi:~$ emacs --debug-init
emacs: error while loading shared libraries: libatk-bridge-2.0.so.0: cannot open shared object file: No such file or directory
pyyhttu@raspberrypi:~$
I decided to wait it out. So during the night, the packages were reverted and next morning I updated the repositories again with:
sudo aptitude update && sudo aptitude safe upgrade
[...]
Fetched 492 kB in 2s (238 kB/s)

Current status: 68 (+9) upgradable, 73195 (+3) new.
Resolving dependencies...
The following NEW packages will be installed:
  libatk-bridge2.0-0t64{a} libatk1.0-0t64{a} libatspi2.0-0t64{a}
The following packages will be REMOVED:
  libatk-bridge2.0-0{u} libatk1.0-0{u} libatspi2.0-0{u}
The following packages will be upgraded:
  cpp-13 cpp-13-x86-64-linux-gnu gcc-13 gcc-13-base gcc-13-x86-64-linux-gnu libdeflate0 libgcc-13-dev libunistring5 xclip
The following packages are RECOMMENDED but will NOT be installed:
  at-spi2-core xauth
9 packages upgraded, 3 newly installed, 3 to remove and 59 not upgraded.
Need to get 33.6 MB/33.8 MB of archives. After unpacking 53.2 kB will be used.
Do you want to continue? [Y/n/?]
[...]
After which emacs worked again.
Update/upgrade the whole system. Before doing that, check the firmware version:
$ /opt/vc/bin/vcgencmd version
Aug 15 2019 12:06:42
Copyright (c) 2012 Broadcom
version 0e6daa5106dd4164474616408e0dc24f997ffcf3 (clean) (release) (start)
Then issue:
$ sudo aptitude full-upgrade
This will also update the latest stable firmware. Non-stable beta firmware is installed with rpi-update.
Good to know: Starting of Rpi4, device actually has onboard upgradable firmware stored on an EEPROM chip where the firmware upgrade is written, instead of an SD-card.
Pi-hole installation on Raspberry Pi OS
As per tutorial from smarthomebeginner.com.
To install Pi-hole:
$ wget -O basic-install.sh https://install.pi-hole.net
$ sudo bash basic-install.sh
Installer runs:
For Interface: eth0
For upstream DNS provider: Cloudflare
For third party block lists: all (by default)
For Protocols: both IPv4 and IPv6
For Static IP Address: This should be the same 10.0.1.245 I setup in the router.
For Web admin interface: Yes
For Web Server: lighttpd
For log queries: Yes (disable after a while once everything runs smoothly to save SD card)
Once installer has finished with “Installation Complete!” ensure that Pi-hole is up and running:
$ pihole status
[✓] DNS service is running
[✓] Pi-hole blocking is Enabled
Ad-blocking can be tested on an ad-infested site, such as speedtest.net or at https://canyoublockit.com/.
Note on canyoublockit.com: Part of the advertisement in there are served from the same domain, which isn’t Pi-hole’s use case. In that case additional blocker, like ublock origin is needed.
Post-installation configuration tasks
DONE Configure router to use Pi-hole as a DNS sinkhole
In Asus RT-AC86U router
go to: WAN, Internet Connection: Connect to DNS Server automatically: No
Edit: Above is not needed, and actually breaks WireGuard installation later on.
Go to: LAN - DHCP Server - DNS Server and set it to your rpi3 IP: 10.0.1.245
If you’re using Merlin firmware, then also set Advertise router's IP in addition to user-specified DNS as No.
DONE Add blocklists
Pi-hole is now installed and can be logged in at http://10.0.1.245/admin/login, or at http://pi.hole/admin/login.
Browse to Group Management - Lists to add blocklists.
Add well known dbl.oisd.nl blocklist, but consider using mirrors, e.g. https://raw.githubusercontent.com/ookangzheng/dbl-oisd-nl/master/dbl.txt
Another alternative is to use Wally3k’s list. I only subscribe to “ticked” lists.
I use both dbl.oisd.nl and Wally3k’s lists.
Update : dbl.oisd.nl is deprecated. Instead, use hosts formatted lists. A good selection is at https://firebog.net.
The default blocklists Pi-hole comes with are also OK to be used, and reverting to them is easy if you later decide to do so.
Optional: Analyze blocklists
After having been running the Pi-hole with the above blocklists for several weeks, analyze which lists you need based on your browsing behaviour. See Pihole Adlist Tool.
Get the script:
$ wget -O pihole_adlist_tool https://raw.githubusercontent.com/yubiuser/pihole_adlist_tool/master/pihole_adlist_tool
Run the script:
$ bash pihole_adlist_tool
Maintenance
DONE Disable automatic daily updates
This is is done in order to be in control what is installed and not get unexpected breakages. Daily updates disabled as per this StackExchange post:
$ sudo systemctl mask apt-daily-upgrade
$ sudo systemctl mask apt-daily
$ sudo systemctl disable apt-daily-upgrade.timer
$ sudo systemctl disable apt-daily.timer
DONE Install OS-updates
$ sudo aptitude update
$ sudo aptitude safe-upgrade
List all installed, and automatically installed aptitude packages:
$ sudo aptitude search '~i'
Show removed packages whose config files have not been removed:
$ dpkg -l | grep '^rc'
These config files can be removed with:
$ sudo aptitude purge ~c
Also, remember to clean the /var/cache/apt/archives periodically:
$ sudo aptitude clean
DONE Upgrade Raspberry Pi OS
New releases of Raspberry Pi OS are periodically informed at Raspberry Pi blog.
$ sudo apt update
$ sudo apt full-upgrade
Update : Full-upgrade is no longer needed with move to Debian Sid. See Upgrade Raspberry Pi OS version from Debian Buster to Debian Bullseye.
DONE Upgrade Pi-hole
Get updated on new versions of Pi-hole when they’re available by subscribing to rss feed of their Github release channel.
Before upgrading Pi-hole, disable Monit service (See: Monit and healthchecks.io philosophy) if you have it in use:
$ sudo service monit stop
This is done because “daemon restart initiated by monit is not advisable during a Pi-hole update/upgrade”. See Pi-hole’s discourse page for more info.
Then initiate Pi-hole update with:
$ sudo pihole -up
  [i] Checking for updates...
  [i] Pi-hole Core:     update available
  [i] Web Interface:    up to date
  [i] FTL:              update available

  [i] Pi-hole core files out of date, updating local repo.
  [✓] Check for existing repository in /etc/.pihole
  [✓] Update repo in /etc/.pihole

  [i] If you had made any changes in '/etc/.pihole/', they have been stashed using 'git stash'

  [i] FTL out of date, it will be updated by the installer.

  [✓] Root user check

        .;;,.
        .ccccc:,.
         :cccclll:.      ..,,
          :ccccclll.   ;ooodc
           'ccll:;ll .oooodc
             .;cll.;;looo:.
                 .. ','.
                .',,,,,,'.
              .',,,,,,,,,,.
            .',,,,,,,,,,,,....
          ....''',,,,,,,'.......
        .........  ....  .........
        ..........      ..........
        ..........      ..........
        .........  ....  .........
          ........,,,,,,,'......
            ....',,,,,,,,,,,,.
               .',,,,,,,,,'.
                .',,,,,,'.
                  ..'''.

  [i] Existing PHP installation detected : PHP version 7.3.14-1~deb10u1
  [i] Performing unattended setup, no whiptail dialogs will be displayed
  [✓] Disk space check
  [✓] Update local cache of available packages

  [✓] Checking apt-get for upgraded packages... 6 updates available
  [i] It is recommended to update your OS after installing the Pi-hole!

  [i] Installer Dependency checks...
  [✓] Checking for apt-utils
  [✓] Checking for dialog
  [✓] Checking for debconf
  [✓] Checking for dhcpcd5
  [✓] Checking for git
  [✓] Checking for iproute2
  [✓] Checking for whiptail

  [i] Performing reconfiguration, skipping download of local repos
  [✓] Resetting repository within /etc/.pihole...
  [✓] Resetting repository within /var/www/html/admin...
  [i] Main Dependency checks...
  [✓] Checking for cron
  [✓] Checking for curl
  [✓] Checking for dnsutils
  [✓] Checking for iputils-ping
  [✓] Checking for lsof
  [✓] Checking for netcat
  [✓] Checking for psmisc
  [✓] Checking for sudo
  [✓] Checking for unzip
  [✓] Checking for wget
  [✓] Checking for idn2
  [✓] Checking for sqlite3
  [✓] Checking for libcap2-bin
  [✓] Checking for dns-root-data
  [✓] Checking for resolvconf
  [✓] Checking for libcap2
  [✓] Checking for lighttpd
  [✓] Checking for php7.3-common
  [✓] Checking for php7.3-cgi
  [✓] Checking for php7.3-sqlite3

  [✓] Enabling lighttpd service to start on reboot...
  [✓] Checking for user 'pihole'

  [i] FTL Checks...

  [✓] Detected ARM-hf architecture (armv7+)
  [i] Checking for existing FTL binary...
  [i] Latest FTL Binary already installed (v4.3.1). Confirming Checksum...
  [i] Checksum correct. No need to download!
  [✓] Checking for user 'pihole'
  [✓] Installing scripts from /etc/.pihole

  [i] Installing configs from /etc/.pihole...
  [i] Existing dnsmasq.conf found... it is not a Pi-hole file, leaving alone!
  [✓] Copying 01-pihole.conf to /etc/dnsmasq.d/01-pihole.conf

  [i] Installing blocking page...
  [✓] Creating directory for blocking page, and copying files
  [✗] Backing up index.lighttpd.html
      No default index.lighttpd.html file found... not backing up

  [✓] Installing sudoer file

  [✓] Installing latest Cron script

  [✓] Installing latest logrotate script
  [i] Backing up /etc/dnsmasq.conf to /etc/dnsmasq.conf.old
  [✓] man pages installed and database updated
  [i] Testing if systemd-resolved is enabled
  [i] Systemd-resolved is not enabled
  [✓] Restarting lighttpd service...
  [✓] Enabling lighttpd service to start on reboot...
  [i] Restarting services...
  [✓] Enabling pihole-FTL service to start on reboot...
  [✓] Restarting pihole-FTL service...
  [✓] Deleting existing list cache
  [i] Pi-hole blocking is enabled
  [✗] DNS resolution is currently unavailable
  [✓] DNS resolution is now available

  [i] Neutrino emissions detected...
  [✓] Pulling blocklist source list into range

  [i] Target: raw.githubusercontent.com (hosts)
  [✓] Status: Retrieval successful

  [i] Target: mirror1.malwaredomains.com (justdomains)
  [✓] Status: Retrieval successful

  [i] Target: sysctl.org (hosts)
  [✓] Status: Retrieval successful

  [i] Target: zeustracker.abuse.ch (blocklist.php?download=domainblocklist)
  [✓] Status: Retrieval successful

  [i] Target: s3.amazonaws.com (simple_tracking.txt)
  [✓] Status: Retrieval successful

  [i] Target: s3.amazonaws.com (simple_ad.txt)
  [✓] Status: Retrieval successful

  [i] Target: hosts-file.net (ad_servers.txt)
  [✓] Status: Retrieval successful

  [i] Target: smokingwheels.github.io (allhosts)
  [✗] Status: Not found
  [✗] List download failed: no cached list available

  [i] Target: gist.githubusercontent.com (Test.txt)
  [✓] Status: Retrieval successful

  [✓] Consolidating blocklists
  [✓] Extracting domains from blocklists
  [i] Number of domains being pulled in by gravity: 149202
  [✓] Removing duplicate domains
  [i] Number of unique domains trapped in the Event Horizon: 126670
  [i] Number of whitelisted domains: 199
  [i] Number of blacklisted domains: 4
  [i] Number of regex filters: 16
  [✓] Parsing domains into hosts format
  [✓] Cleaning up stray matter

  [✓] Force-reloading DNS service
  [✓] DNS service is running
  [✓] Pi-hole blocking is Enabled

  [i] The install log is located at: /etc/pihole/install.log
Update Complete!

  Current Pi-hole version is v4.4
  Current AdminLTE version is v4.3.3
  Current FTL version is v4.3.1
After the update is completed, start monit (if you’ve installed it):
$ sudo service monit start
DONE Upgrade to V6
$ pihole -up results with Raspbian as:
[✗] Unsupported OS detected: Raspbian 10
At this point installation seemed to break something already, as I couldn’t anymore reach http://10.0.1.245/admin/login
Solution was to bypass OS-version check:
$ sudo PIHOLE_SKIP_OS_CHECK=true pihole -r
Then select Repair:
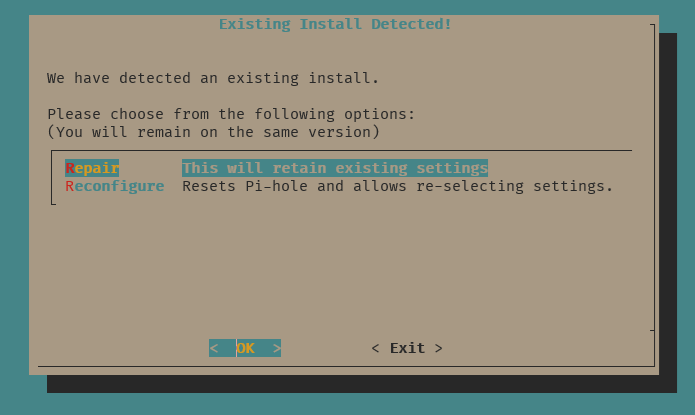
Notable differences to V5:
- No dependencies anymore to lighttpd or PHP, you can remove both after the upgrade with:
$ sudo systemctl stop lighttpd && sudo systemctl disable lighttpd
$ sudo aptitude purge lighttpd
: As lighttpd is no longer needed, remove its service also from raspibackup backup config by rerunning the raspibackup installation script and its section C6 Services to stop and start. Otherwise backups will fail leaving you with inactive (dead) services because raspibackup script will fail on lighttpd PID not existing anymore and exits with (code=killed, signal=TERM).
- Pi-hole commands now requires
sudoto operate. - HTTPS-support added as optional. If taken into use login through https://pi.hole/admin/login (or https://10.0.1.245/admin/login).
- Pi-hole settings all in master configuration file at /etc/pihole/pihole.toml rather than scattered around.
- Pi-hole UI hides now configuration values: Change from “Basic” to “Expert” mode to see them all.
DONE Inspect Pi-hole messages
Messages can be found from: http://10.0.1.245/admin/messages (or http://pi.hole/admin/messages) and reveal possible issues.
DONE Check periodically memory card wear
To manually check memory card wear, do:
$ sudo badblocks -v /dev/mmcblk0p1
Checking blocks 0 to 43924

Checking for bad blocks (read-only test): done

Pass completed, 0 bad blocks found. (0/0/0 errors)
Optional: Automate checks with Monit
If you have installed monit, you can automatize above check, do:
$ sudo nano /etc/monit/monitrc
And append there:
check program badblocks with path "/sbin/badblocks /dev/mmcblk0p1"
  every "30 19 * * 6"
  if status != 0 then alert
Alternative is to use sdmon. I have it running for Kingston SDCE-card based on this report.
DONE Install Log2ram
This is optional but heavily recommended as it increases the life span of your SD-card by preventing the constant writes.
Optional: Install Log2ram
As query logging is enabled and those logs are saved to SD-card, the card can wear out in few months. To prolong card’s life span, save query logs in memory with log2ram, and write them only once per every hour 6 to SD card. With log2ram, since logs will then reside much of their time in volatile RAM, the downside is that in case of system/device crash, I lose those logs, which complicates troubleshooting.
However, Pi-hole with its accompanied services have been rock-solid, so prolonging the lifetime of a SD-card brings more value.
$ echo "deb http://packages.azlux.fr/debian/ buster main" | sudo tee /etc/apt/sources.list.d/azlux.list
$ wget -qO - https://azlux.fr/repo.gpg.key | sudo apt-key add -
$ sudo aptitude update
$ sudo aptitude install log2ram
Increase the SIZE parameter of the RAM directory from default 40M to 320M in order to avoid in the future the error message: ERROR: RAM disk too small. Can't sync. when stopping & starting services with raspiBackup. Do:
$ sudo nano /etc/log2ram.conf
# Size for the ram folder, it defines the size the log folder will reserve into the RAM.
# If it's not enough, log2ram will not be able to use ram. Check you /var/log size folder.
# The default is 40M and is basically enough for a lot of applications.
# You will need to increase it if you have a server and a lot of log for example.
SIZE=320M
For changes to take effect, restart the service:
$ sudo service log2ram restart
Or alternatively reboot:
$ sudo reboot
After restart/reboot, test that log2ram is invoked:
pyyhttu@raspberrypi:~ $ service log2ram status
● log2ram.service - Log2Ram
   Loaded: loaded (/etc/systemd/system/log2ram.service; enabled; vendor preset: enabled)
   Active: active (exited) since Sat 2020-01-18 09:33:45 EET; 3h 3min ago
  Process: 261 ExecStart=/usr/local/bin/log2ram start (code=exited, status=0/SUCCESS)
  Process: 3583 ExecReload=/usr/local/bin/log2ram write (code=exited, status=0/SUCCESS)
 Main PID: 261 (code=exited, status=0/SUCCESS)
Log2ram will also be mounted at /var/log:
pyyhttu@raspberrypi:~ $ df -h
Filesystem      Size  Used Avail Use% Mounted on
/dev/root        15G  2.1G   12G  15% /
devtmpfs        459M     0  459M   0% /dev
tmpfs           464M  1.7M  462M   1% /dev/shm
tmpfs           464M  6.3M  457M   2% /run
tmpfs           5.0M  4.0K  5.0M   1% /run/lock
tmpfs           464M     0  464M   0% /sys/fs/cgroup
/dev/sda1       7.1G  2.5G  4.3G  37% /backup
/dev/mmcblk0p1   43M   23M   20M  53% /boot
log2ram         320M   41M   60M  41% /var/log
tmpfs            93M     0   93M   0% /run/user/999
tmpfs            93M     0   93M   0% /run/user/1000
DONE Further manage storage and logs
Restore query logging and implement actions as here.
REJECTED Upgrade Raspberry Pi OS version from Debian Buster to Debian Bullseye
Use these repositories. But it seems that it would resulting in disabling OS version check. Better wait for official Pi-hole release.
Update : Version FTL v5.9 supports Debian 11. Update repositories as per this post, or this post, and followup threads on success rate, such as this. Also weigh in if you should try to first setup second pihole, and for update, try the "semi-official upgrade instructions. Before upgrading to bullseye, test the restore operation of latest raspiBackup. After upgrading to bullseye, check if Predictable Network Interface Names are edited.
Update : This was a hassle. The update did not fail but after a reboot, device wasn’t anymore discoverable in network. Reverted with backups.
Rasbian is not made for rolling release, and thus every major OS version upgrade, which are inevitable with point release operating systems, culminate to a risk scenario where I need to reinstall everything again. Which means, that I either,
- establish infrastructure as a code and learn to configure everything with something like Ansible
- start running Pi-hole dockerized
- investigate on rolling/development release distribution, revert in case of failures with raspiBackup while maintaining second Pi-hole for high availability.
At this point, I’ll go with option 3) and with Debian Sid. See Install Debian on Pi Zero W
Troubleshooting
Pi-hole error messages are normally visible from /var/log/pihole.log, /var/log/pihole-FTL.log or /var/log/syslog. If the need is to inspect boot time logs then do
$ dmesg | less or $ journalctl.
DONE $ pihole status gives “DNS Service is NOT running”
So far this error has occurred twice, and there can be multiple root causes for the error. Start by checking errors with:
$ journalctl -u pihole-FTL --full --no-pager
Normally this should just return “– No entries –”.
In the first error case there was an error entry:
dnsmasq: illegal repeated keyword at line 33
of /etc/dnsmasq.d/01-pihole.conf_bak
Error was resolved after deleting the above 01-pihole-conf_bak backup file I had created and then doing:
$ sudo service pihole-FTL restart
In the second case:
$ journalctl -u pihole-FTL --full --no-pager the error entry was:
dnsmasq: failed to create
listening socket for port 53: Address already in use
I also checked my cloudflared setup for encrypted DNS with:
$ systemctl status cloudflared.service
There was an error msg:
failed to connect to an HTTPS backend
\"https://1.1.1.1/dns-query\"" error="failed to perform an HTTPS request:
Post https://1.1.1.1/dns-query: net/http: request canceled (Client.Timeout
exceeded while awaiting headers)
So by doing:
$ sudo systemctl restart cloudflared.service and then again:
$ systemctl status cloudflared.service
The error was no longer visible. Also:
$ pihole status should now give:
[✓] DNS service is running
[✓] Pi-hole blocking is Enabled
DONE After rebooting pi, $ ssh pyyhttu@10.0.1.245 errors out with: Resource temporarily unavailable
Also ping to 10.0.1.245 did not respond. In my case I needed to unplug the power cord, and reattach it to reboot. For some reason, boot sequence did not complete on the first try.
DONE After Gravity updating the blocklists, the dashboard shows “Domains on Blocklist 0”
This was the first time blocklist update caused 0 Domains on blocklist. It may be linked to the fact that either monit or healthcheck.io caused the update to fail.
Gravity updates the blocklist on randomly selected time between 3 am and 5 am my local time (to equalize server loads): /var/log/syslog shows my update started 03:49 and logs shows no errors.
Tried updating gravity manually:
$ pihole -g but that did not help.
Finally, by disabling monit with
$ sudo service monit stop and commenting out healthcheck.io cron with:
$ crontab -e and then doing repair with
$ sudo pihole -r after which the correct blocklist was shown in the Pi-hole dashboard.
DONE Investigate why certain clients gradually obtain multiple IPv4-addresses
This is evident by going in pi.hole to network overview. Trying first to flush the network clears some multiple ip-addresses assigned, but not all. Deleting every entry with sqlite3 does clear everything, along the clients, but after a while client entries are repopulating back, some with multiple IP addresses assigned to them again.
Doing now Settings, Flush network table does clear the Network overview table so that clients in the table are left with single IPV4-address, but again, temporarily. After a while, Samsung television e.g. gets multiple IPs, like 10.0.1.251, 10.0.1.252 and 10.0.1.253.
Trying next that I assign these devices an IP manually. Assigning an IP manually, then adding the IP and a custom DNS entry at http://pi.hole/admin/settings/dnsrecords helped somewhat: now network overview at least has the hostname visible. Let’s see if they only will get a single IPv4.
: Inspecting https://10.0.1.245/admin/network and all the hosts in the list have now a single IPv4-address seen by Pi-hole.
DONE Log2ram failed and exited with an error code
$ service log2ram status
● log2ram.service - Log2Ram
Loaded: loaded (/etc/systemd/system/log2ram.service; enabled; vendor preset: enabled)
Active: failed (Result: exit-code) since Sat 2020-12-12 03:21:39 EET; 5 days ago
Main PID: 17699 (code=exited, status=1/FAILURE)

Warning: Journal has been rotated since unit was started. Log output is incomplete or unavailable.
Also, the service won’t restart:
$ sudo service log2ram restart
Job for log2ram.service failed because the control process exited with error code.
See "systemctl status log2ram.service" and "journalctl -xe" for details.
pi@raspberrypi:/var/log $ systemctl status log2ram.service
● log2ram.service - Log2Ram
Loaded: loaded (/etc/systemd/system/log2ram.service; enabled; vendor preset: enabled)
Active: failed (Result: exit-code) since Thu 2020-12-17 16:51:26 EET; 11s ago
Process: 7311 ExecStart=/usr/local/bin/log2ram start (code=exited, status=1/FAILURE)
Main PID: 7311 (code=exited, status=1/FAILURE)

Dec 17 16:51:26 raspberrypi systemd[1]: Starting Log2Ram...
Dec 17 16:51:26 raspberrypi log2ram[7311]: ERROR: RAM disk for "/var/hdd.log/" too small. Can't sync.
Dec 17 16:51:26 raspberrypi log2ram[7311]: /usr/local/bin/log2ram: 45: /usr/local/bin/log2ram: mail: not found
Dec 17 16:51:26 raspberrypi systemd[1]: log2ram.service: Main process exited, code=exited, status=1/FAILURE
Dec 17 16:51:26 raspberrypi systemd[1]: log2ram.service: Failed with result 'exit-code'.
Dec 17 16:51:26 raspberrypi systemd[1]: Failed to start Log2Ram.
Root cause seemed to be that RAM disk is too small so increasing that in /etc/log2ram.conf to 320M and doing
$ sudo service log2ram restart fixed the issue.
DONE Ensure that logrotate is working, or disable pihole query logging
morning noticed that raspiBackup had failed. /var/log size had grown past 40M, and due to that, log2ram service didn’t start, failing raspiBackup. It seems that pihole logging takes most of the space:
pyyhttu@raspberrypi:/var/log $ du -sh -- * | sort -h
[...]
1.2M    auth.log
1.2M    daemon.log
1.3M    auth.log.1
1.7M    pihole.log
33M     pihole.log.1
Monitor how big /var/log/ will grow and whether 160M is enough (it is not). Consider
disabling
query logging (Settings > System > Disable query logging). This means
that can’t tail the logs ($ pihole tail), but will still see the
queries in the query log and dashboard.
For now, I’ve increased in /etc/log2ram.conf from the default 40M to the SIZE=320M which seems to be enough.
DONE Warning in dnsmasq core:
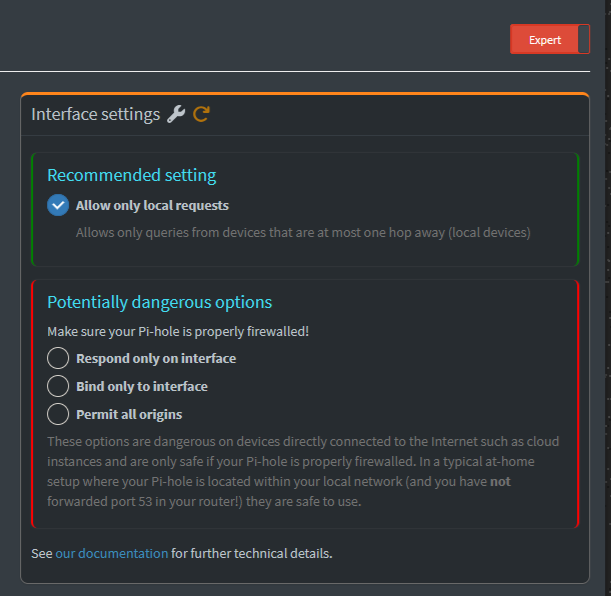
Error was: ignoring query from non-local network 100.115.92.133 (logged only once). Noticed this error on as DNSMASQ_WARN in Pi-hole diagnosis. This may be due to fact I have WireGuard VPN setup on the same device. As per analysis here, I have now "Allow only local requests" changed to "Bind only to inferface eth0" at http://10.0.1.245/admin/settings/dns. Observing if error returns.
update: The warning has not returned but I’ve kept setting "Allow only local requests" on.
Observations, questions and future direction
DONE Experiment with Privacy settings vs. data collected
Privacy settings are in Pi-hole at /admin/settings/privacy. Set privacy level to 3 - Anonymous mode and consider disabling the query logging, as documented here. However, note that without query logging there’s no chance troubleshoot false positives from blocklists.
Most privacy friendly settings in use are:

More about on logging and collecting data here.
DONE Observe with iphone, when at home and attached to both cellular and wifi
Does cellular takes precedence over wifi, rendering the ad-blocking useless?
Yes, seems so. Either disable in iOS “Wifi Assist” under Settings - Cellular.
Or then tunnel through Wireguard VPN all the time. This comes with some battery consumption.
Update: Seems to be that having the WireGuard tunnel always on does not result in noticeable battery consumption. On Androids, where having WireGuard baked in as a module in custom kernels the performance and battery consumption should be even more better.
DONE Observe DNS lease expirations
Validate when leases expire, as the IP changes which complicates the setup of WireGuard.
Update: it seems that the lease has been gradually getting more time (interval unknown), observable by doing:
$ ipconfig /all
NEXT Harden security
See Raspberry Pi documentation and Debian documentation.
Also implement points from this post and this post as actionable list.
Enable automatic, unattended security updates. Investigate if this is possible with Debian Sid. Install DebsecScan.
DONE if someone wants out…
I may want opt out certain production/work devices by manually configuring each device. For above to take effect, purging iOS DNS cache may require toggling the wifi on/off.
Update: Starting with Pi-hole v5.0 onward, above per-client manual DNS settings are no longer needed. Pi-hole supports per-client blocking. Effectively we can then group everyone’s devices and define whether or not they’re part of Pi-hole. To set this up, see Per-client blocking examples. For this to work reliably, remember to assign in router a manual IP for every such device.
tl;dr: If you want to exclude a device from Pi-hole, assign in Pi-hole a client to a group, then remove the client from the default group.
DONE Harden pihole’s blocking with regexp
See relevant reddit regexp thread for more info. I added mmotti/regexp list from github.
DONE Investigate on setting SSL (https) for the admin panel at http://10.0.1.245/admin
Prior V6 the self-signed certificate was not implemented as this would be futile for many reasons.
After upgrading Pi-hole to V6, the HTTPS-support is, however, offered either by providing my own certificate or using an auto-generated one. The certificate allows me to access Pi-hole admin panel via https://10.0.1.245/admin (or https://pi.hole/admin). Read more here.
Install the .pem-certificate also to iOS devices so that Safari don’t complain when accessing Pi-hole admin.
DONE flash router with Merlin
Merlin is an alternative firmware to stock Asus firmware. However, Merlin is not without its problems. Merlin allows to me force DNS traffic to router, as referenced also in here. Remember these things when upgrading the Merlin firmware.
NEXT Set Asus router with Merlin firmware to force all port 53 traffic (DNS) to Pi-hole
Do this after upgrade to Merlin. Some devices have hard coded DNS servers that can’t be changed via DHCP or manually. This is disturbingly an increasing trend among device manufacturers, so I must consider forcing all local network route traffic to Pi-hole. Here’s a great explanation what is happening on technical level.
Here’s the instructions for Asus router and the comment link here has screenshotted instructions among routing rules.
Having two Pi-holes, or alternatively having one Pi-hole setup and adding a virtual IP to it so the badly behaving devices see 2 DNS servers, seem to mitigate these devices from calling their own DNS server, and bypassing Pi-hole.
Hard coded DNS servers may also become an issue when using iOS 14.
This is also evident if messages like “This network is blocking DNS traffic” starts to pop up in iOS 14.
When forcing traffic through port 53, pay attention if tutorial guides disabling dhcp on router, and enabling it on Pi-hole. Don’t do that, but investigate after installing Merlin (“John’s fork”) for N66U, if rerouting can be done with this tutorial instead.
If after Merlin upgrade I experience high amount of traffic from router visible in Pi-hole statistics, apply these router configs.
See also General Merlin troubleshooting.
On defining DNS servers in Merlin (check the screenshot on that thread).
When testing the force routing of traffic through port 53, use your Phillips Hue lamps as guinea pigs as they seem to have hardcoded dns.
NEXT Setup keepalived for two piholes
See this. You will then have HA between two piholes.
NEXT Setup DNSFilter on Merlin
DONE Observe with new router in case of loop back
REJECTED Consider logging querying and visualisation options, like ELK
Before installing Elk, run diagnostic on what is system load before and after installing the Elk stack. Memory usage, processor usage etc.
Edit: Explored ELK and considered that it is not needed, as it complicates the install, eat resources of Rpi3 and the fancy charts offer me no real value over the regular charts Pi-hole comes bundled with.
NEXT Investigate whether Skynet + Yazfi script is beneficial for IP banning and extra security in Asus router.
For Skynet investigate on this reddit thread. For Yazfi scripts, look here.
USB drive is required for Swap: https://www.snbforums.com/threads/skynet-installation-help.88080/
Skynet forum: https://www.snbforums.com/search/1105236/?q=skynet+usb&t=post&c%5Bchild_nodes%5D=1&c%5Bnodes%5D%5B0%5D=60&o=relevance
https://www.snbforums.com/threads/skynet-installation-help.88080/
Disable password ssh-authentication to router. Enable only key based authentication. Save SSH key to KeepassXC & Strongbox.
DONE Disable wifi and bluetooth radios
In order to save power and resources, disable unnecessary services by doing:
$ sudo systemctl disable wpa_supplicant
$ sudo systemctl disable bluetooth
$ sudo systemctl disable hciuart
$ echo "dtoverlay=pi3-disable-bt" | sudo tee -a /boot/config.txt
$ echo "dtoverlay=pi3-disable-wifi" | sudo tee -a /boot/config.txt
$ sudo reboot
After a reboot, wlan and bluetooth radios should not be on anymore. You can check this by doing:
$ systemctl status wpa_supplicant.service
$ sudo systemctl status bluetooth.service
$ sudo systemctl status hciuart.service
Update : Noticed from kernel boot up messages at /var/log/boot.msg that wifi may not be down properly, as there was an error:
Failed to start Disable WiFi if country not set
Also running:
$ systemctl status wifi-country.service gave:
● wifi-country.service - Disable WiFi if country not set
   Loaded: loaded (/lib/systemd/system/wifi-country.service; enabled; vendor preset: enabled)
   Active: failed (Result: exit-code) since Thu 2022-06-23 18:10:20 EEST; 2 weeks 6 days ago
 Main PID: 458 (code=exited, status=1/FAILURE)
Defined as per this article in /etc/wpa_supplicant/wpa_supplicant.conf a line:
country=FI is needed to be added. After this the error was gone.
REJECTED Investigate DNSCrypt for anonymized DNS
As described in r/pihole. Installing this is expected to increase my DNS resolving time, but by how much, needs to be measured. Currently running:
$ dig @127.0.0.1 -p 5053 google.co.uk
gives 19 msec, same as here for a guy with cloudflare DNS. If after implementing and measurement it’s the resolution is of same ballpark, leave the setting in.
Update: It seems to be that DNSCrypt does not bring me any benefits.
NEXT New router with Raspberry Pi Zero W as a backup DNS for high availability
If ever buying a new router, I could equip it with a Raspberry Pi Zero W on router’s powered usb, as a backup DNS-server. This would also result in even smaller power footprint with no cords. However, getting power through only the USB would be a conscious risk as RasberryPi does not negotiate the power with host and I end up with a broken system.
Still, people have been running Rpi Zero W powered directly from routers usb without issues, so this is worth the risk.
Also, it seems that Asus routers implement RNDIS on their USB lane which Pi Zero would use, I could then potentially use the same lane for its Ethernet and power, disabling wireless from Pi Zero completely.
And if the raspiBackup system is implemented on Pi Zero with the same monitoring and backup restore settings I now have on Rpi4 the risk to service is minimized and worth a try.
Since I then will have two Pi-Holes operating, I’d like to keep their blocklists synchronized.
Tutorial for running two Pi-holes in high availability mode could be achieved manually by following this tutorial and in automated fashion with gravity-sync (preferred). Orbital-Sync or Nebula-sync is also an option.
New router could be Asus RT-AC86U, since it can support also WireGuard loaded in.
But, with that setup people have been getting on 1 Gbit connection only 450 Mbit/s on it, while WireGuard on rpi4 can push ~600 Mbit/s.
So it needs to be tested/googled whether the router could handle faster traffic than 450 Mbit/s (although that is plenty for my connection now).
There are also other open firmwares out there, e.g. OpenWRT, AdvancedTomato, etc.
NEXT Install Debian on Pi Zero W
Idea, and also experience so far is, that with Debian Sid and apt-listchanges and apt-listbugs would
enable a working production environment for me with which I would not need to go through OS
reinstall through whenever major version support ends. Instead, I would do every weekend manual sudo aptitude update & sudo aptitude safe-upgrade, inspect the changelogs, pin packages with bugs, and despite this if something goes wrong, revert to backups taken previous night.
Start by checking Debian RaspberryPi and Debian raspi faq.
Then download tested image (Family 1, 0W).
Continue with these instructions. Do:
Enable remote SSH root login (disable this later once non-root user is setup). As root (#) do:
# echo "PermitRootLogin yes" >> /etc/ssh/sshd_config
Images come with empty root password, so change that to something else:
# passwd root
Set the hostname:
# hostnamectl set-hostname
The images come with wireless support, so add to /etc/network/interfaces.d/wlan0:
allow-hotplug wlan0
iface wlan0 inet dhcp
    wpa-ssid MYNETWORK
    wpa-psk MYPASSWORD
Reboot, give enough time for DHCP to handout an IP then ssh to it and do the rest remotely:
$ ssh root@10.0.1.246
- Set up user pyyhttu
- Set up groups
- apt update && upgrade
- set sources to sid (deb https://ftp.debian.org/debian/ sid contrib main non-free non-free-firmware)
- disable remote root login
NEXT Configure Debian unattended upgrades
Details
For security updates only, if possible. See: https://wiki.debian.org/UnattendedUpgrades
NEXT Install 64-bit Raspberry Pi OS Lite on Rpi3B+.
Then turn its repositories to Debian Unstable (Sid). Remember to add non-free firmware. Remember to setup wifi with nmcli instead of wpa_supplicant.
NEXT Enable in Pi-hole admin panel Conditional forwarding
- Conditional forwarding is enabled to display
client names instead of their IPs in Pi-hole admin panel. This would also save me the trouble of having to edit the reservations and hosts file manually when new clients are added to the network.
- In Asus RT-AC86U go to LAN - DHCP Server and define for field “RT-AC86U's Domain Name” a Domain Name (e.g. house).
- Log in to Pi-hole and go to: Settings - DNS and tick "=Use Conditional
Forwarding=“. Define for ”Local network in CIDR notation“: ”10.0.0.0/24“, ”IP address of your DHCP server (router)“: 10.0.1.1 and for ”Local domain name": house.
- Make sure that “Never forward non-FQDNs” and "=Never forward reverse lookups
for private IP ranges=" are also ticked; otherwise the clients’ names in Pi-hole dashboard are still displayed with their IPs only 7.
- Update : After setting up new router (Asus AC86U) hostnames are now again not displayed in Pi-hole
under Tools, Network, but are displayed as IPs. It seems this behavior is router specific.
- So far, my only resolution would be to enable DHCP in Pi-hole, instead of the
router, OR, flash both routers (Ai Mesh) with Merlin, as I may be able to disable Asus router’s DNS that way.
NEXT Troubleshooting conditional forwarding on Asus routers
- As per this reddit post.
FOLLOWUP ISPs IPv6 enablement
Once my ISP (Elisa) takes IPv6 into use, then there’s is a potential slow down scenario with Pi-hole:
Some ISPs do not hand out static IPv6 addresses. So if you configured Pi-hole with an IPv6 address during installation and that address is later changed by your ISP, you now run into the problem the wrong (i.e. an invalid) IPv6 address in gravity.list. Because Pi-hole looks to this file to find out where to go, your computer cannot find that IP address and the requests time out, causing the long loading times.
Eventually I need to take IPv6 into use and set it up in my router’s settings.
Once done, I need to retest my IPv6 readiness at http://test-ipv6.com/.
DONE Add hard coded IP addresses to the list of NTP servers
None of the rpi3’s have a built-in hardware clock 8, so they rely on a network time server to get the correct time.
Unbound requires the system clock to be pretty close to real time or it cannot resolve DNS queries.
All of the default NTP servers are setup as fully qualified hostnames, so in in an event of downtime, the clock will be off. Thus, after restart unbound can not resolve the hostnames of the ntp servers.
To prevent this in the future, add several hard coded IP addresses to /etc/systemd/timesyncd.conf. But first, check that your time is correct:
$ timedatectl
         Local time: Sun 2020-03-08 16:54:30 EET
     Universal time: Sun 2020-03-08 14:54:30 UTC
           RTC time: n/a
          Time zone: Europe/Helsinki (EET, +0200)
System clock synchronized: yes
        NTP service: active
    RTC in local TZ: no
$ systemctl status systemd-timesyncd.service
● systemd-timesyncd.service - Network Time Synchronization
Loaded: loaded (/lib/systemd/system/systemd-timesyncd.service; enabled; vendor preset: enabled)
Drop-In: /lib/systemd/system/systemd-timesyncd.service.d
     └disable-with-time-daemon.conf
Active: active (running) since Sat 2020-02-29 13:27:19 EET; 1 weeks 1 days ago
Docs: man:systemd-timesyncd.service(8)
Main PID: 335 (systemd-timesyn)
Status: "Synchronized to time server for the first time 95.216.24.230:123 (2.debian.pool.ntp.org)."
Tasks: 2 (limit: 2200)
Memory: 1.4M
CGroup: /system.slice/systemd-timesyncd.service
     └335 /lib/systemd/systemd-timesyncd

Warning: Journal has been rotated since unit was started. Log output is incomplete or unavailable.
Add the NTP server IPs:
$ sudo nano /etc/systemd/timesyncd.conf
[Time]
NTP=162.159.200.123
FallbackNTP=185.112.82.30 95.216.160.182 95.217.10.168
#RootDistanceMaxSec=5
Above IP-addresses are of fi.pool.ntp.org specific pool zone: https://www.ntppool.org/zone/fi
Ensure time synchronize is enabled:
$ sudo timedatectl set-ntp true
Restart the NTP Daemon:
$ sudo systemctl daemon-reload
DONE iOS shortcut to quickly see status and disable/enable Pi-hole
Instructions as per this reddit thread.
- In iOS, go to Settings, Shortcuts and enable Allow Untrusted Shortcuts.
- With iOS browser, go to https://routinehub.co/shortcut/5005 and download the shortcut.
- Edit it in Shortcuts and scroll down to section DICTIONARY, and add under settings values:
| Settings | Value |
|---|---|
| Pi-hole Server | http://10.0.1.245 |
| API Key | YOUR_API_KEY |
API Key can be found in Pi-hole Settings, API / Web interface and Show API token.
NEXT Control panel for system statistics
As per instructions here.
DONE Review whether Raspberry PI OS is anymore trustworthy and start migrating to another OS
Reasoning in this Reddit thread. tl;dr: In a recent update, the Raspberry Pi Foundation installed a Microsoft vscode apt repository on all machines running Raspberry Pi OS.
Another OS could be Debian (thought it has a performance penalty compared to Raspberry Pi OS) and non-free firmware.
NEXT Enable UEFI secure boot
Do this for the next version image: https://lobste.rs/s/gls60k/uefi_secure_boot_on_raspberry_pi
DONE Install and configure on iOS Pi-hole Remote
This is optional but recommended if you own an iOS device as it makes managing the devices, blocklists etc. easier.
Open the app and go to Settings, fill details:
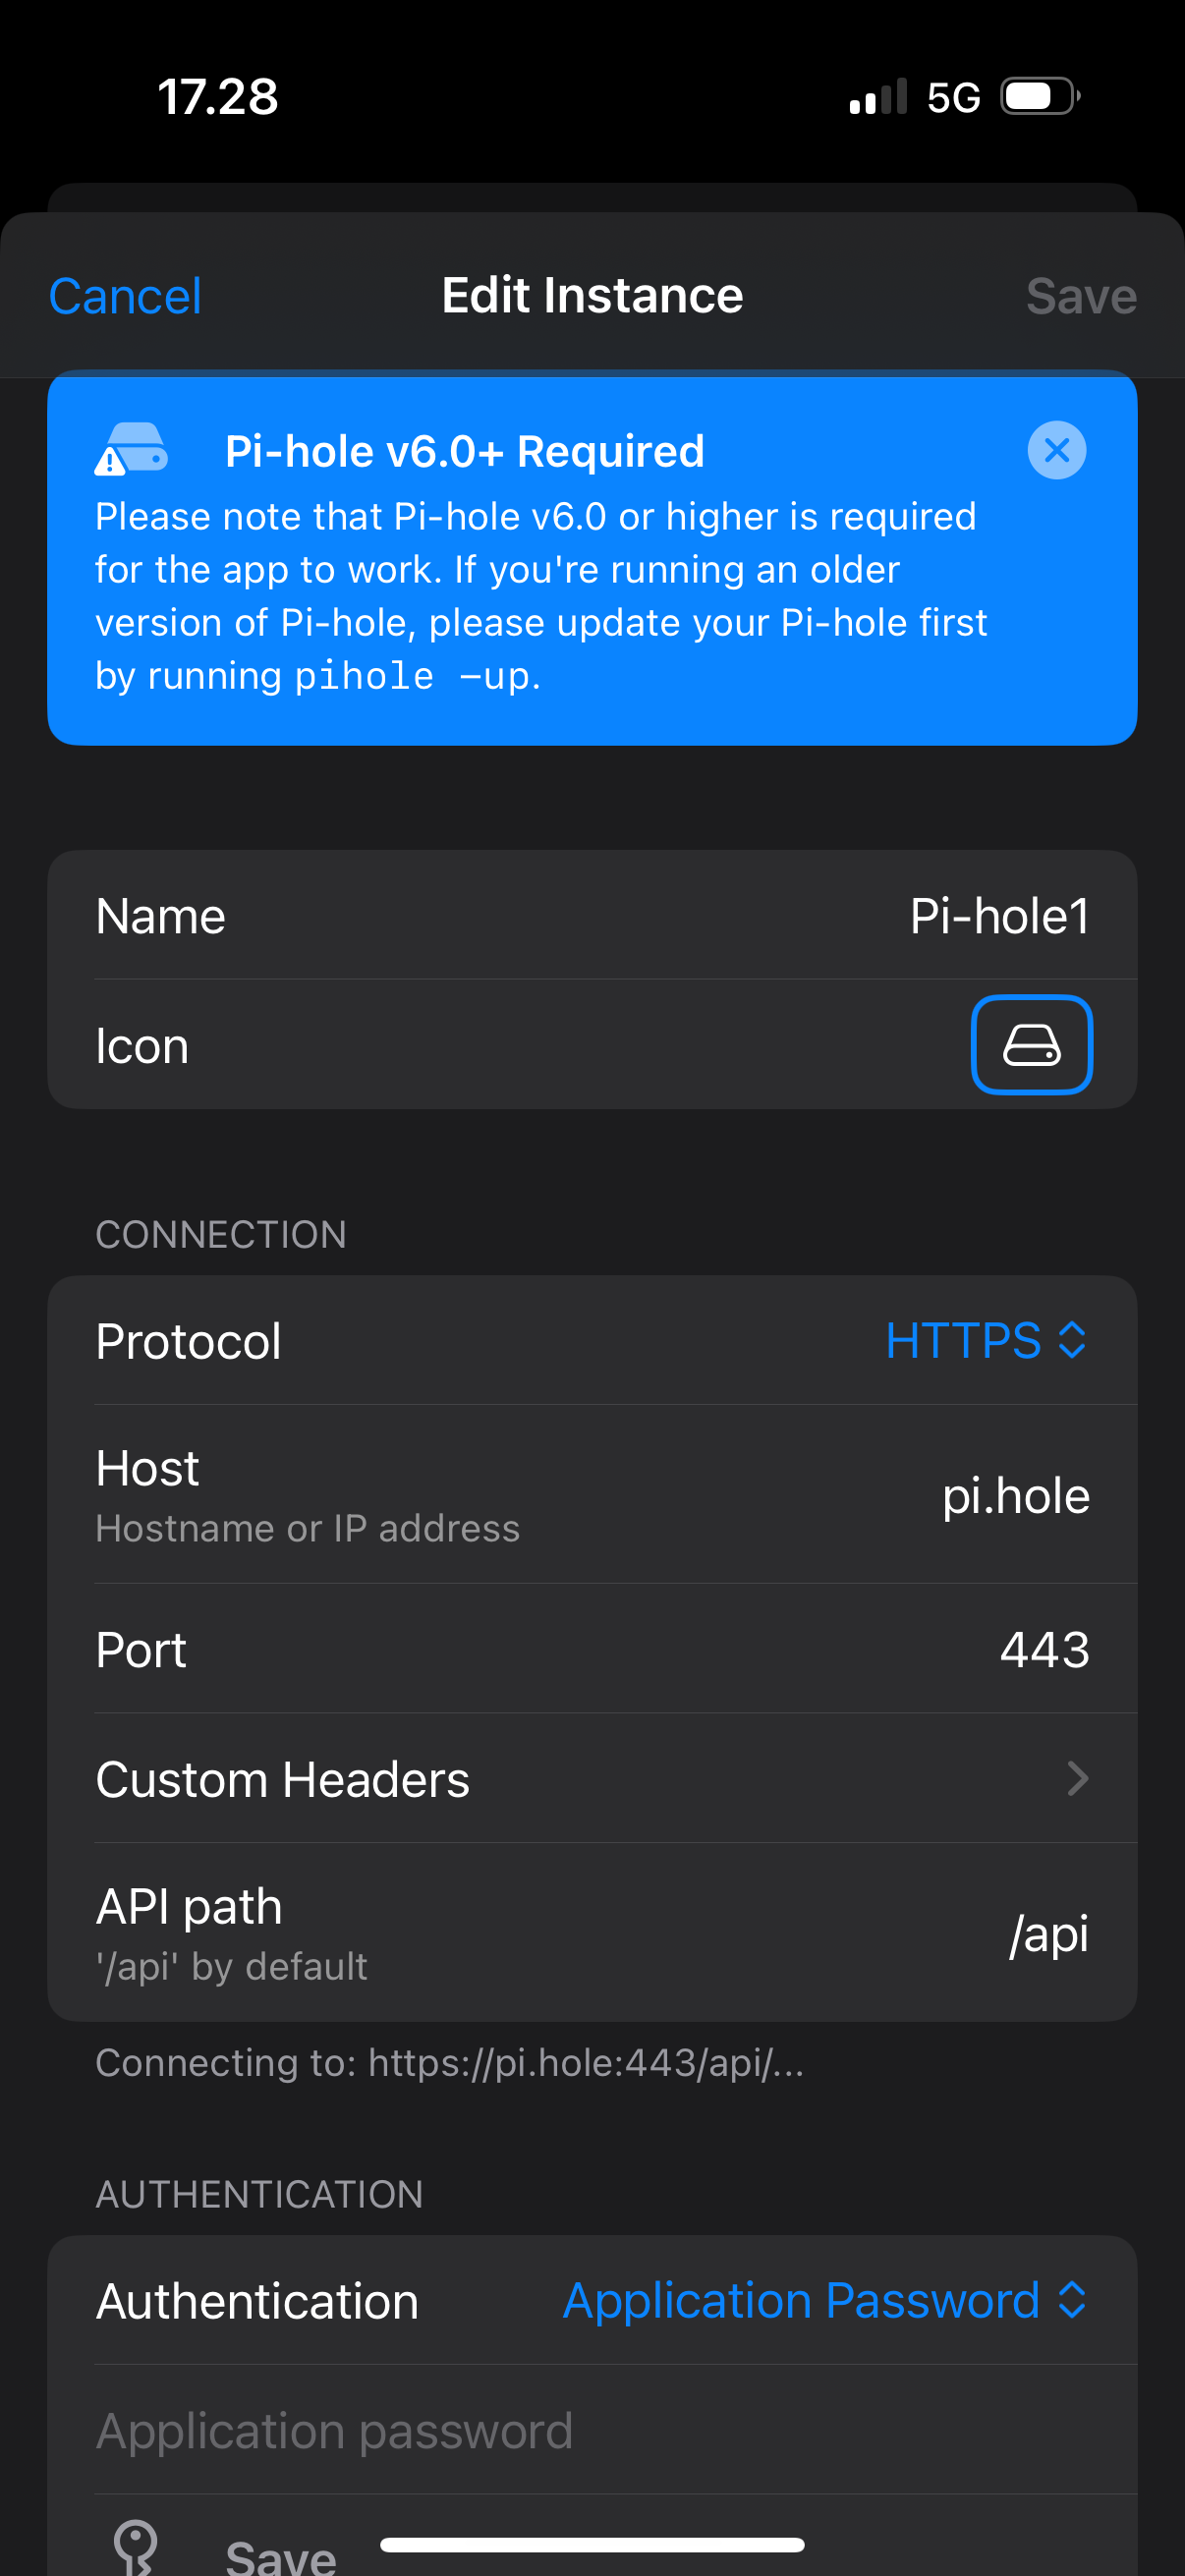
For Authentication select Application Password which you can define at https://pi.hole/admin/settings/api. Enable Expert settings from top right corner then select Configure app password:
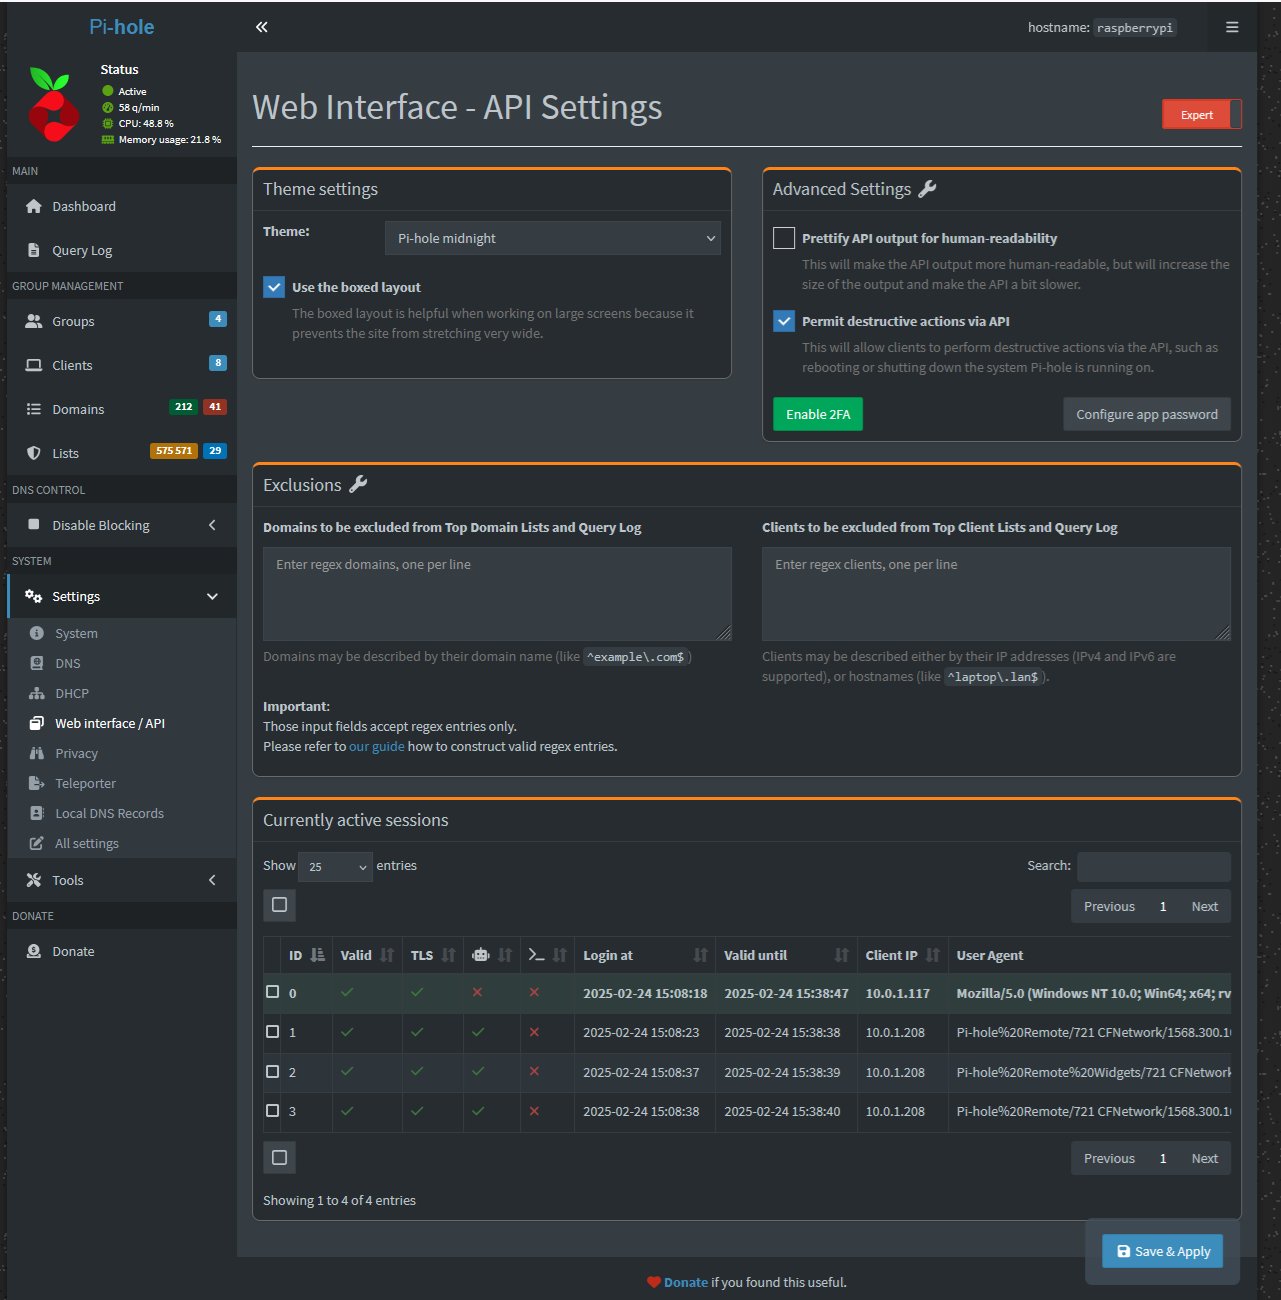
You can also authenticate the app with your regular Pi-hole password, but app passwords are more secure as you don’t need to trust the app with your Pi-hole pass.
Type in the Application password in the app and Save.
Wireguard philosophy

When outside of my home network, I can:
- route traffic through the Pi-hole with WireGuard,
- block advertisements everywhere9,
- gain access to Finnish georestricted content when abroad,
- and gain access to my home network.
Why WireGuard, and not OpenVPN?
In summarum WireGuard comparison to OpenVPN: WireGuard is simple to setup on server side, roaming when using mobile devices (connection loss is rare), quicker to establish connection and significantly less battery drain on mobile devices, and does not rely on AES-NI encryption making it ideal for ARM-based boards.
Note: Those with faster than 100 Mbps connection with WireGuard, may want to go for rpi4, as it has a true gigabit wired LAN adapter onboard (rpi3 adapter is hampered by the shared USB 2.0). My connection is Elisa 100 down / 10 up so rpi3 is enough.
Preparation
As per guide at r/pihole 10. Alternative, easier, but in this document an untested method is scripted piVPN installation. Here’s alternative, newer installation instructions.
Check your connection speed 11:
$ sudo aptitude install speedtest-cli
$ speedtest-cli
Retrieving speedtest.net configuration...
Testing from Elisa Oyj (88.115.55.164)...
Retrieving speedtest.net server list...
Selecting best server based on ping...
Hosted by Netplaza Oy (Helsinki) [7.91 km]: 18.786 ms
Testing download speed................................................................................
Download: 88.16 Mbit/s
Testing upload speed......................................................................................................
Upload: 10.43 Mbit/s
If download speed is greater than 100 Mbit/s, then connection speed bottleneck can be avoided with rpi4.
Pre-installation tasks on Raspberry Pi OS
DONE Verifying I have publicly-reachable IP address provided by my ISP
If ISP uses CGNAT (Carrier-Grade NAT), then I will not have a publicly-reachable IP address on my home network. This limits my ability to run a private VPN, since I don’t have a direct gateway to the public Internet.
To verify this, I need to check public IP, also known as WAN IP, either from my Asus RT-AC86U router dashboard at:
General - Network Map, or by running:
$ curl ifconfig.me
If either of the methods return an IP that is of range 100.xxx.xxx.xxx or 10.xxx.xxx.xxx or 192.xxx.xxx.xxx, then it is an indication ISP uses CGNAT.
For ultimate verification, run traceroute to inspect the amount of network hops:
$ curl ifconfig.me | xargs traceroute
I have a result of a single hop in the results, which means I’m not behind CGNAT:
$ curl ifconfig.me | xargs traceroute
  % Total    % Received % Xferd  Average Speed   Time    Time     Time  Current
                                 Dload  Upload   Total   Spent    Left  Speed
100    13  100    13    0     0     68      0 --:--:-- --:--:-- --:--:--    68
traceroute to 88.115.55.164 (88.115.55.164), 30 hops max, 60 byte packets
 1  88-115-55-102.elisa-laajakaista.fi (88.115.55.102)  0.447 ms  0.272 ms  0.215 ms
If there is more than single hop, I’m behind ISPs CGNAT and I need to request a publicly routable IP address, or instead of self-hosting the WireGuard VPN, consider using a service like Tailscale, Cloudflare Tunnel, or Twingate.
Installation on Raspberry Pi OS
Note: Alternative method to Debian unstable repository below is to compile from source.
$ sudo aptitude install raspberrypi-kernel-headers
NEXT Installation using Debian Unstable sources
As per instructions here. Update: Rewrite these instructions (check the link) since September 2021, WireGuard package has been available in RasperryPI OS repository.
$ echo "deb http://deb.debian.org/debian/ unstable main" | sudo tee --append /etc/apt/sources.list.d/unstable.list
$ wget -O - https://ftp-master.debian.org/keys/archive-key-$(lsb_release -sr).asc | sudo apt-key add -
$ printf 'Package: *\nPin: release a=unstable\nPin-Priority: 150\n' | sudo tee --append /etc/apt/preferences.d/limit-unstable
$ sudo aptitude update
After this, loads of new package updates are available from Sid, something like:
Current status: 12756 (+12755) new.
Now I have the latest version of WireGuard (0.0.20190601-1) available from debian sid repositories, install that with dependencies:
$ sudo aptitude install WireGuard
Post-installation configuration tasks
Once WireGuard is installed, enable IP Forwarding in raspberry pi, then reboot the Pi:
$ perl -pi -e 's/#{1,}?net.ipv4.ip_forward ?= ?(0|1)/net.ipv4.ip_forward = 1/g' /etc/sysctl.conf
$ reboot
IPv4 port forwarding is now enabled in Pi, ensure that output of this is 1:
$ sysctl net.ipv4.ip_forward
DONE Generate private and public keys
Keys are generated for WireGuard server and a client:
$ sudo su
# cd /etc/wireguard
# umask 077
# wg genkey | tee client1_privatekey | wg pubkey > client1_publickey
# wg genkey | tee server_privatekey | wg pubkey > server_publickey
Four keys are now generated.
DONE Configure WireGuard server on Raspberry pi
# nano /etc/wireguard/wg0.conf
wg0.conf should contain:
[Interface]
Address = 10.9.0.1/24
ListenPort = 51819
PrivateKey = {server_privateKey}
DNS = 10.0.1.245

PostUp = iptables -A FORWARD -i %i -j ACCEPT; iptables -A FORWARD -o %i -j ACCEPT; iptables -t nat -A POSTROUTING -o eth0 -j MASQUERADE
PostDown = iptables -D FORWARD -i %i -j ACCEPT; iptables -D FORWARD -o %i -j ACCEPT; iptables -t nat -D POSTROUTING -o eth0 -j MASQUERADE

[Peer]
#Client1 - iOS home
PublicKey = /3pz2xGhL+jTs3h9+nQ6fTeokvIPduj22afN1LYDn20=
AllowedIPs = 10.9.0.2/32, 10.0.1.245/32
PersistentkeepAlive = 60
Where,
- Address
- Server’s internal IP address to bypass the traffic through WireGuard. We get to assign it. Let’s use 10.9.0.1/24. This should be assigned outside of router’s DHCP IP pool range.
- ListenPort
- In order to access home network from outside, configure a port forward. This is the external UDP port I’ve forwarded in router (WAN - Virtual Server/Port Forwarding). WireGuard’s default port is 51820, but we’ll opt on using 51819. Nondefault listenPort is handy, if e.g. using public wifi. Furthermore, choosing port below 1024 may help circumventing blocking established by various providers. E.g. using port 989 (FTPS).
- PrivateKey
- Value from
$ cat server_privatekey - PostUp & PostDown
- Change eth0 to wlan0 in both lines if raspberry pi with pi-hole is connected via Wi-Fi, otherwise eth0 (this is presumed) 12.
- PublicKey
- Value from
$ cat client1_publickey - AllowedIPs
- Client-IP/32 (keep it as is), Pi-hole’s IP
- PersistentkeepAlive
- this line is uncommented (remove the #) to keep the connection alive as I’m behind a NAT.
DONE Configure client config file on Raspberry pi
The following config (client1.conf) goes ultimately to my iOS WireGuard, but we configure the file on rpi3 and then export it using qrencode, as it is faster this way.
Create the config file by doing:
# nano /etc/wireguard/client1.conf
client1.conf should contain:
 1: [Interface]
 2: Address = 10.9.0.2/32
 3: DNS = 10.0.1.245
 4: PrivateKey = {client1_privatekey}
 5:
 6: [Peer]
 7: PublicKey = 0zV8aMt5Yu9jyL9jTOhR574/zX2kJdr21PuhpcamdmE=
 8: Endpoint = 88.115.55.164:51819
 9: AllowedIPs = 0.0.0.0/0, ::/0
10: #PersistentkeepAlive = 60
Where,
- Line 2 = Assigned IP of client
- DNS = Pi-Hole’s IP
- Privatekey = value from
$ cat client1_privatekey - Publickey = value from
$ cat server_publickey - Endpoint = public-ip : WireGuard-port-forwarded-in-router.
Current public-ip value can be checked by doing:
# curl ifconfig.me
Note: When I get another public IP from my ISP, at latest when I reboot the router. It needs to be then updated to iOS WireGuard config.
Update: Updating the public IP to iOS Wireguard config is no longer a necessity after setting up Dynu and ddclient.
AllowedIPs = 0.0.0.0/0, ::/0 (where 0.0.0.0/0, ::/0 allows all traffic to route through WireGuard aka full access to my home network). Note: ::/0 or ::0/:) are the same thing; they’re there to prevent ipv6 leakage.
OR Instead of full tunnel, if I wanted a split tunnel:
Split tunnel just splits the traffic, some via WireGuard, some via phone internet.
Phone wants to access google - phone queries dns server on your lan to get IP address. Raspberry Pi returns 8.8.8.8. Phone uses mobile connection to connect to google.
Phone wants to connect to your device pc.home.lan - phone queries dns server on your lan. Raspberry Pi returns 192.168.1.5. As this on your lan, and within the AllowedIP traffic is sent via WireGuard.
As per this reddit thread.
NEXT Setup guest wlan network
In order to effectively test split tunnel setup with a phone in it.
DONE Export the client configuration to iOS WireGuard using QR Code
Change to root (#):
# sudo su
# aptitude install qrencode
# qrencode -t ansiutf8 < /etc/wireguard/client1.conf
A QR code will be generated, you will need to scan this code and import it to the WireGuard app on the phone by tapping Add Tunnel and then Create from QR Code.
After that, your iOS WireGuard tunnel is created with the following settings:
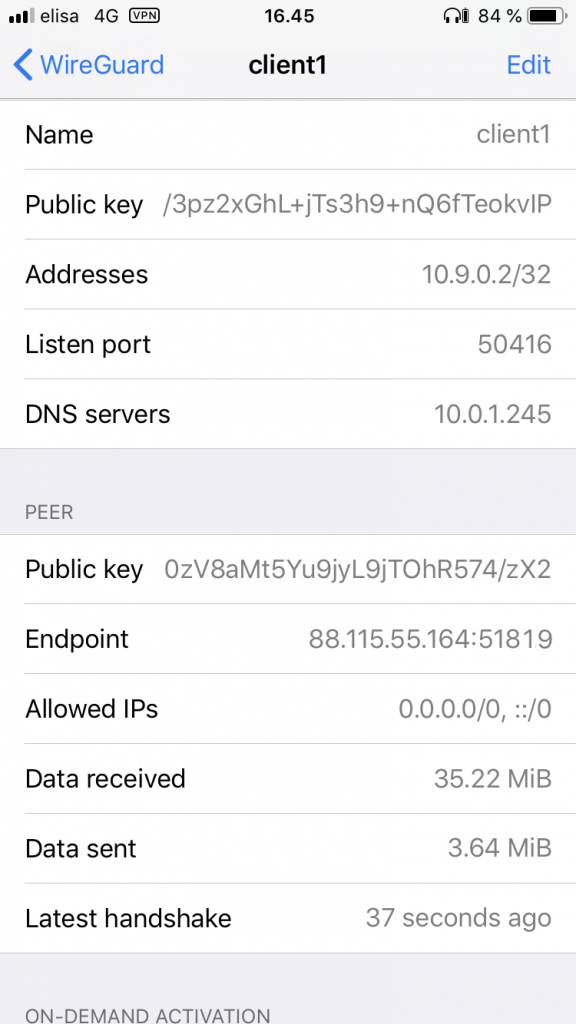
Note: If the tunnel is not established and the iOS WireGuard Settings - View log shows: [NET]peer(0zV8...mdmE) - Handshake did not complete after 5 seconds, retrying (try 2), then have a look at your iOS Settings - General - VPN & Device Management - VPN and toggle there on Status -> Connected. For some reason, this is required sometimes for the tunnel to be established. This is a one-time operation and hasn’t needed to be toggled in further attempts to establish the tunnel.
Exit root:
# exit
DONE Finalize installation
Enable WireGuard to autostart on boot:
$ systemctl enable wg-quick@wg0
Secure the contents of /etc/wireguard as it contains your private keys:
$ sudo chown -R root:root /etc/wireguard/
$ sudo chmod -R og-rwx /etc/wireguard/*
Go to Pi-Hole Admin console at /admin/settings/dns and tick mark the following:
[X] Allow only local requests
Allows only queries from devices that are at most one hop away (local devices)
Then start WireGuard by doing:
$ sudo wg-quick up wg0
DONE Test that WireGuard tunnel is working
- Run a DNS leak test by browsing to dnsleaktest.com and executing there “Standard test”. Public IP should be visible.
- In the iOS app, check that data is exchanging in lines “Data sent” and “Data received” while connected.
On WireGuard server side traffic can be seen by inspecting the WireGuard routing table and peer connections with:
$ sudo wg show
interface: wg0
  public key: 0zV8aMt5Yu9jyL9jTOhR574/zX2kJdr21PuhpcamdmE=
  private key: (hidden)
  listening port: 51819

peer: /3pz2xGhL+jTs3h9+nQ6fTeokvIPduj22afN1LYDn20=
  endpoint: 85.76.86.141:31960
  allowed ips: 10.9.0.2/32, 10.0.1.245/32
  latest handshake: 1 minute, 4 seconds ago
  transfer: 693.34 KiB received, 23.40 MiB sent
  persistent keepalive: every 1 minute
The “endpoint” ip of 85.76... above indicates my phone is attached to cellular network while WireGuard tunnel is on. If I was in my home wlan with WireGuard, the endpoint ip would be 10.0.1.1.
- Check the ‘Query Log’ page in Pi-hole’s Admin console. You’ll see queries
coming from the wg client IP (10.9.0.2 in this case).
- Lastly, check status of WireGuard:
root@raspberrypi:/etc/wireguard# systemctl status wg-quick@wg0.service
● wg-quick@wg0.service - WireGuard via wg-quick(8) for wg0
   Loaded: loaded (/lib/systemd/system/wg-quick@.service; enabled; vendor preset: enabled)
   Active: active (exited) since Mon 2019-07-01 18:31:53 BST; 2 weeks 0 days ago
     Docs: man:wg-quick(8)
           man:wg(8)
           https://www.WireGuard.com/
           https://www.WireGuard.com/quickstart/
           https://git.zx2c4.com/WireGuard/about/src/tools/man/wg-quick.8
           https://git.zx2c4.com/WireGuard/about/src/tools/man/wg.8
 Main PID: 604 (code=exited, status=0/SUCCESS)

Jul 01 18:31:51 raspberrypi systemd[1]: Starting WireGuard via wg-quick(8) for wg0...
Jul 01 18:31:51 raspberrypi wg-quick[604]: [#] ip link add wg0 type WireGuard
Jul 01 18:31:51 raspberrypi wg-quick[604]: [#] wg setconf wg0 /dev/fd/63
Jul 01 18:31:52 raspberrypi wg-quick[604]: [#] ip -4 address add 10.9.0.1/24 dev wg0
Jul 01 18:31:52 raspberrypi wg-quick[604]: [#] ip link set mtu 1420 up dev wg0
Jul 01 18:31:52 raspberrypi wg-quick[604]: [#] resolvconf -a tun.wg0 -m 0 -x
Jul 01 18:31:52 raspberrypi wg-quick[604]: [#] ip -4 route add 10.0.1.245/32 dev wg0
Jul 01 18:31:52 raspberrypi wg-quick[604]: [#] iptables -A FORWARD -i wg0 -j ACCEPT; iptables -A FORWARD -o wg0 -j AC
Jul 01 18:31:53 raspberrypi systemd[1]: Started WireGuard via wg-quick(8) for wg0.
Traffic should be routed through Pi-hole. Check that by doing:
$ ip r | grep default
default via 10.0.1.1 dev eth0 src 10.0.1.245 metric 202
$ ip address show wg0
4: wg0: <POINTOPOINT,NOARP,UP,LOWER_UP> mtu 1420 qdisc noqueue state UNKNOWN group default qlen 1000
    link/none
    inet 10.8.0.1/24 brd 10.8.0.255 scope global wg0
       valid_lft forever preferred_lft forever
    inet 10.9.0.1/24 scope global wg0
       valid_lft forever preferred_lft forever
NEXT Measure overhead
Sadly, due to overhead, you’ll get a little less bandwidth than if you were on the network directly. But bandwidth is adequate for my purposes, assuming I’m on a stable Internet connection.
You can test the overhead from the VPN connecting while you’re on your home LAN. Try this, and run a speed test on https://speed.cloudflare.com, once without the VPN connected, and once connected. Compare the two speeds and that’s the overhead of the VPN connection.
On my LAN, the download speed goes from around 600 Mbps to 237 Mbps, but upload remains close to the measly 35 Mbps Spectrum gives me.
And connected through my iPhone on AT&T over a pretty poor signal (2/4 bars), I can get 32 Mbps down and 4 up through the VPN—not too bad! That’s a little under line speed on the iPhone through AT&T directly, but it’s workable, and has saved me a few times when I needed to grab something from the LAN remotely!
Source: https://www.jeffgeerling.com/blog/2023/build-your-own-private-WireGuard-vpn-pivpn
Maintenance
DONE Setting up new client accesses manually
On server side 10.0.1.245 do:
$ sudo su
And create new key pair for the client to be added:
# cd /etc/wireguard && wg genkey | tee client2_private_key | wg pubkey > client2_public_key
Then register key on the server:
# wg set wg0 peer <client2_public_key> allowed-ips <new_client_vpn_IP>/32
Where,
| Parameter | Description |
|---|---|
| client2_publickey | Value from $ cat client2_public_key |
| new_client_vpn_IP | 10.9.0.3/32 |
On client side, install WireGuard on the client OS. Depending on the OS, apply the installation instructions from official website. On Ubuntu based distro:
# su pi
$ sudo add-apt-repository ppa:WireGuard/WireGuard
$ sudo apt-get update
$ sudo apt-get install WireGuard-dkms WireGuard-tools resolvconf linux-headers-$(uname -r)
On client OS side, create wg0-client.conf with:
[Interface]
Address = 10.9.0.3/32
PrivateKey = <insert_client2_privatekey>
DNS = 10.0.1.245

[Peer]
PublicKey = <insert server_publickey>
Endpoint = <insert_vpn_server_address>:51819
AllowedIPs = 0.0.0.0/0
PersistentKeepalive = 60
On client side, bring up the VPN interface and form a tunnel by doing:
$ sudo wg-quick up wg0-client
Tunnel should now be active. Check that by doing:
$ sudo wg show
To disconnect do:
$ sudo wg-quick down wg0-client
REJECTED Setting up new client accesses automatically
Consider using WireGuard Config Generator or WireGuard-Tools Script.
Update : After considering the above, they’re not needed as qrencode works nicely enough and creating new accesses is simple yet rare occassion.
DONE Client access revocation
If needed to revoke the client from the server, remove the [Peer] block related to your revoked client from the server’s configuration wg0.conf, then restart your VPN server with:
$ sudo wg-quick down wg0
$ sudo wg-quick up wg0
DONE WireGuard kernel module needs to be recompiled
This is to be done when new kernel-headers get updated after doing
$ sudo aptitude safe-upgrade
After updating the headers, purge both WireGuard and WireGuard-dkms:
$ sudo aptitude purge WireGuard WireGuard-dkms
Then reinstall them:
$ sudo aptitude install WireGuard WireGuard-dkms
Lastly reboot by doing:
$ sudo reboot
And recheck tunnel status with:
$ wg show
Troubleshooting
DONE WireGuard tunnels collapsed on router firmware update
Updated Asus stock firmware to newest version (3.0.0.4.386_45956) but after this none of the clients using WireGuard VPN worked. This was evident from ever increasing time stamps of latest handshakes:
$ sudo wg show
pyyhttu@raspberrypi:~ $ sudo wg show
interface: wg0
  public key: 0zV8aMt5Yu9jyL9jTOhR574/zX2kJdr21PuhpcamdmE=
  private key: (hidden)
  listening port: 51819

peer: /3pz2xGhL+jTs3h9+nQ6fTeokvIPduj22afN1LYDn20=
  endpoint: 10.0.1.1:1026
  allowed ips: 10.9.0.2/32
  latest handshake: 17 minutes, 50 seconds ago
  transfer: 8.79 GiB received, 45.61 GiB sent
  persistent keepalive: every 1 minute

peer: guoJge3walbBMS+PMWVKpBDPkM7JaIxIcrb4xlBfnzU=
  endpoint: 10.0.1.1:1025
  allowed ips: 10.9.0.4/32
  latest handshake: 18 minutes, 33 seconds ago
  transfer: 610.86 MiB received, 5.83 GiB sent

peer: P0eDIPcZPSuELfma6DScKSriYXn/N/JzmeHUkHfqrz8=
  endpoint: 10.0.1.1:1024
  allowed ips: 10.9.0.3/32, 10.0.1.245/32
  latest handshake: 24 minutes, 23 seconds ago
  transfer: 264.57 MiB received, 3.75 GiB sent
  persistent keepalive: every 1 minute
pyyhttu@raspberrypi:~ $
Resolved by restarting WireGuard by doing:
$ sudo wg-quick down wg0 && sudo wg-quick up wg0
DONE WireGuard client keys were removed after connection loss to ISP
Noticed a connection break on . This was also registered by Monit and healthchecks.io. Then noticed that my iOS with WireGuard enabled (on-demand activated), was not able to resolve anything.
iOS WireGuard logs showed an error around the connection break:
Removing all keys, since we haven't received a new one in 540 seconds
Restarting the wg0 service on server by doing:
$ sudo wg-quick down wg0 && sudo wg-quick up wg0 did not help.
Decided to recreate the iOS client keys so that first deleted the keys in iPhone WireGuard (delete tunnel) and then on server recreated the client keys at /etc/wireguard/ by doing:
# qrencode -t ansiutf8 < /etc/wireguard/client3.conf
After scanning the qr-code and receiving the keys, the iOS WireGuard started to work again.
Observations and future direction
DONE Install WireGuard client and config on Linux laptop
Repeat and document the connection speed test as per the guide here. It seems to be that the result are on par with what was presented in the link. Rpi3’s network adapter with my current connection speed is more than enough to act as a WireGuard server.
DONE Setup dynamic DNS Dynu and ddclient to maintain connection
In order to connect to my public home IP where rpi3 WireGuard VPN is running, I need to tie that IP to a dynamic name service (ddns). The reason is that since my public home IP changes all the time and thus would force me otherwise to update it to server side to /etc/wireguard/client1.conf and to WireGuard app on client side. That would be wasteful.
- Start by registering to a dynamic DNS provider, e.g. to dynu.com.
- Choose Option 1: Use our Domain.
- Define wanted domain to be used (e.g. rpivpn.mywire.org) and click Add.
- Go to Control Panel - My Account and define your Time Zone.
In rpi3 terminal, test your domain by doing:
$ nslookup rpivpn.mywire.org
This should return the same IP as shown in Dynu Control Panel - DDNS Services.
In rpi3 terminal, install ddclient, which will recognize when your public IP changes, and updates this to point to rpivpn.mywire.org:
$ sudo aptitude install ddclient libio-socket-ssl-perl
Bypass the setup wizard in every step by pressing esc. Setup ddclient manually:
$ sudo nano /etc/ddclient.conf:
daemon=300
syslog=yes
ssl=yes
protocol=dyndns2
use=web, web=checkip.dynu.com/, web-skip='IP Address'
server=api.dynu.com
login=your-dyny-login
password='your-dynu-password'
rpivpn.mywire.org
Test IP update works to dynu.com by forcing an update manually:
$ sudo ddclient -force -verbose
This update should be registered in dynu control panel (observable by the updated time stamp).
Automate this update to be every 5 minutes:
$ sudo nano /etc/default/ddclient
run_dhclient="false"
run_ipup="false"
run_daemon="true"
daemon_interval="300"
Start ddclient as a service:
$ sudo service ddclient start
Check the service is started correctly as active: (running) by doing:
$ sudo service ddclient status
Test the automated update service works. Change IP to something to 1.2.3.4 in Dynu control panel at DDNS Services.
Delete in rpi3 the ddclient.cache:
sudo rm /var/cache/ddclient/ddclient.cache
Wait for 5 minutes after which ddclient should’ve updated the dummy IP 1.2.3.4 back to correct.
Now client1.conf and client2.conf can be updated with dynamic dns rpivpn.mywire.org and distributed to clients with:
sudo qrencode -t ansiutf8 < /etc/wireguard/client1.conf
NEXT Install WireGuard Dashboard
As per the article here.
NEXT Find optimal MTU
Use this python-package.
Cloudflare DNS over HTTPS philosophy
As per privacytests.org:
The Domain Name System (DNS) is the method by which web browsers look up the IP address for each website you visit. In a DNS query, a web browser will ask a DNS resolver (somewhere on the internet) for the IP address corresponding to a domain name (such as nytimes.com) for a website you want to visit. Traditionally, most web browsers have sent their DNS queries unencrypted, which means your ISP or anyone else on the network between your computer and the DNS resolver can eavesdrop on the websites you visit. In recent years, web browsers and operating systems have begun to introduce encrypted DNS, including the DNS over HTTPS (DoH) protocol, to encrypt the DNS request from your browser and the response from the resolver to keep your browsing history from leaking. These tests check whether a browser is still protecting its DNS requests by sending them encrypted.
With Cloudflared, I can utlize DNS over HTTPS (DoH) encryption at my home network wide, end-to-end.
The following setup is done with these instructions.
Note: Cloudflared is a single point of failure from privacy point of view, as Cloudflared would have complete record of every DNS request I’ve made, all in one place. So it is a matter of trust. Unbound would solve this, as then I would resolve DNS myself, with a price of little bit slower DNS resolution time (but by how much, needs to be measured).
NEXT Measure DNS resolution time. Implement unbound, then measure again.
Document then measure with this.
Preparation
Disable wireless from iphone, connect to cellural and form a WireGuard VPN tunnel. Then head to Cloudflare’s probing page and check results with iOS Safari. I get:
[?] on Secure DNS
[✓] on DNSSEC
[✓] on TLS 1.3
[x] on Secure SNI (practically ECH)
Failure [x] or non-determination [?] on Secure DNS means, that anybody listening on the traffic can potentially see the DNS queries I make (and since I trust Cloudflare, obv. they can see them as well).
Alternatively, you can run a check also at: https://1.1.1.1/help. Results should he the same.
Note that TLS 1.3 and Secure SNI (ECH) has nothing to do with Cloudflare or Pi-hole: those are measured and supported by my browser.
Pre-installation tasks on Raspberry Pi OS
None
Installation on Raspberry Pi OS
$ wget https://bin.equinox.io/c/VdrWdbjqyF/cloudflared-stable-linux-arm.tgz
$ tar -xvzf cloudflared-stable-linux-arm.tgz
$ sudo cp ./cloudflared /usr/local/bin
$ sudo chmod +x /usr/local/bin/cloudflared
$ cloudflared -v
$ sudo systemctl enable cloudflared
Create a cloudflared user to run the daemon:
$ sudo useradd -s /usr/sbin/nologin -r -M cloudflared
Create a configuration file for cloudflared by copying the following in to /etc/default/cloudflared. This file contains the command-line options that get passed to cloudflared on startup:
# Commandline args for cloudflared
CLOUDFLARED_OPTS=--port 5053 --upstream https://1.1.1.1/dns-query --upstream https://1.0.0.1/dns-query
Update the permissions for the configuration file and cloudflared binary to allow access for the cloudflared user:
$ sudo chown cloudflared:cloudflared /etc/default/cloudflared
$ sudo chown cloudflared:cloudflared /usr/local/bin/cloudflared
Then create the systemd script by copying the following in to /lib/systemd/system/cloudflared.service. This will control the running of the service and allow it to run on startup.
[Unit]
Description=cloudflared DNS over HTTPS proxy
After=syslog.target network-online.target

[Service]
Type=simple
User=cloudflared
EnvironmentFile=/etc/default/cloudflared
ExecStart=/usr/local/bin/cloudflared proxy-dns $CLOUDFLARED_OPTS
Restart=on-failure
RestartSec=10
KillMode=process

[Install]
WantedBy=multi-user.target
Enable the systemd service to run on startup, then start the service and check its status:
$ sudo systemctl enable cloudflared
$ sudo systemctl start cloudflared
$ systemctl status cloudflared
Now test that cloudflared DNS is working. Run the following dig command, a response should be returned similar to the one below:
$ dig @127.0.0.1 -p 5053 google.com
; <<>> DiG 9.11.5-P4-5.1-Raspbian <<>> @127.0.0.1 -p 5053 google.com
; (1 server found)
;; global options: +cmd
;; Got answer:
;; ->>HEADER<<- opcode: QUERY, status: NOERROR, id: 3863
;; flags: qr rd ra; QUERY: 1, ANSWER: 1, AUTHORITY: 0, ADDITIONAL: 1

;; OPT PSEUDOSECTION:
; EDNS: version: 0, flags:; udp: 4096
; COOKIE: b1e011d8a18c455e (echoed)
;; QUESTION SECTION:
;google.com.                    IN      A

;; ANSWER SECTION:
google.com.             116     IN      A       172.217.21.142

;; Query time: 1 msec
;; SERVER: 127.0.0.1#5053(127.0.0.1)
;; WHEN: Sat Nov 30 13:28:16 EET 2019
;; MSG SIZE  rcvd: 77
Post-installation configuration tasks
Finally, configure Pi-hole to use the local cloudflared service as the upstream DNS server. Go to Pi-hole at /admin/settings/dns under Custom DNS Servers and add:
127.0.0.1#5053
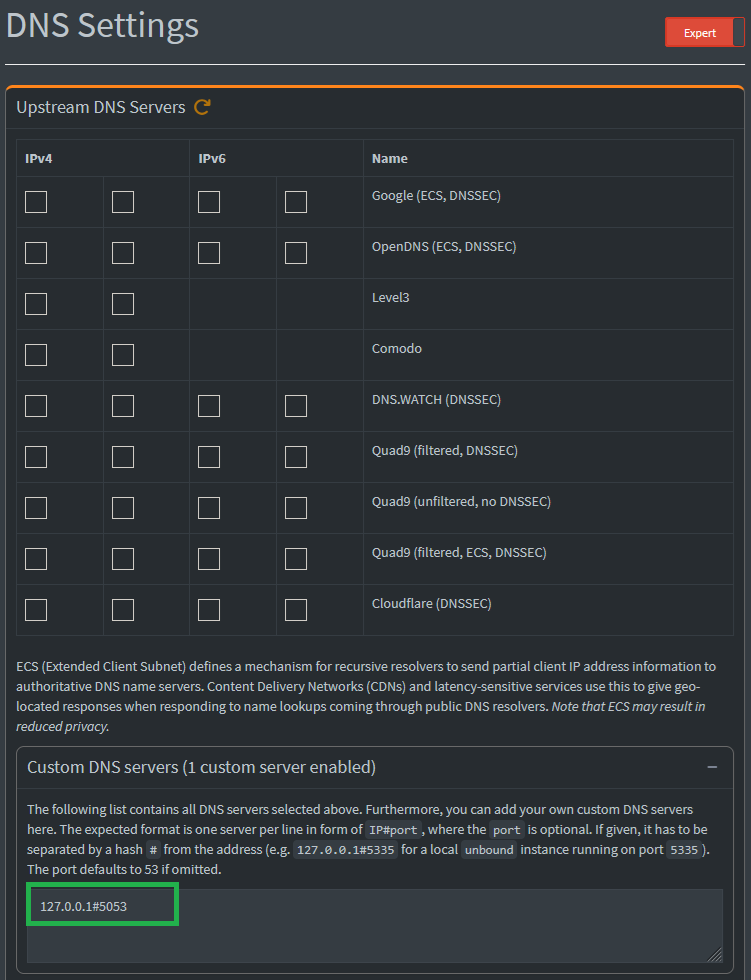
Lastly, remember to remove under Upstream DNS Servers tick boxes for any DNS servers if it had any defined.
Maintenance
DONE Upgrade cloudflared binary version
Check current version with:
$ sudo cloudflared -v
cloudflared version 2019.12.0 (built 2019-12-19-2256 UTC)
Then run update:
$ sudo cloudflared update && sudo systemctl restart cloudflared
INFO[0017] cloudflared has been updated to version 2020.2.0
In case there isn’t an update you will simply get:
2021-04-24T08:44:50Z INF cloudflared is up to date version=
Notification of new updates can be gotten by subscribing to Cloudflared release channel.
Troubleshooting
DONE Temporary failure in name resolution
After did $ sudo reboot, DNS resolution does not work. For example doing $ ping google.com gives:
ping: google.com: Temporary failure in name resolution
Also doing $ sudo monit status gives “Connection failed” on remote host test.
Both are because we use Cloudflared for DSN resolution but Pi-Hole automatically adds 127.0.0.1 to /etc/resolvconf/run/resolv.conf. You can see the file’s timestamp changed after reboot by doing:
$ ls -al resolv.conf
- So if using Cloudlflare for DNS resolution, then update /etc/resolv.conf back to 1.1.1.1
- If/when going to unbound, this should be no longer be an issue as then an entry of 127.0.0.1 in resolv.conf is actually correct.
Edit: Contents of resolv.conf is actually (in a working setup):
nameserver 10.0.1.245
nameserver 127.0.0.1
DONE Cloudflared test site shows DNS-over-HTTPS (DoH) as disabled
After setting up Cloudflared, noticed after a while by visiting their test site that it indicated Using DNS over HTTPS (DoH) as No. Reason turned out to be the DNSSEC setting in Pi-hole I had turned on, as per this reddit-thread. After disabling Use DNSSEC in Pi-hole, the test site indicated correctly I have DoH enabled.
DONE Fix the update failure
$ sudo cloudflared update produces:
failed to update cloudflared: context deadline exceeded (Client.Timeout or
context cancellation while reading body)
Resolved this with instructions from github issue 253.
DONE Cloudflared binary does not update
When trying to update cloudflared:
$ sudo cloudflared update I get:
pi@raspberrypi:~ $ sudo cloudflared update
2021-08-28T15:32:10Z INF cloudflared is up to date version=
pi@raspberrypi:~ $
Also $ cloudflared -v does not give version info but:
pi@raspberrypi:~ $ cloudflared -v
cloudflared version DEV (built unknown)
pi@raspberrypi:~ $
To resolve this, redownload the binary from the same link, and repeat the install procedure (same as manually updating binary.
After this, doing $ cloudflared -v instead of giving “built unknown”, I now get correctly:
pi@raspberrypi:~ $ cloudflared -v
cloudflared version 2021.8.6 (built 2021-08-27-2250 UTC)
Observations and future direction
DONE DNSSec not enabled per Cloudflare browser check site
DNSSEC provides validation that DNS responses are untampered and can be trusted. One such test can be found from Cloudflare’s Browsing Experience Security Check but the site apparently sometimes provides false positives, which is evident also from this post.
To reproduce, disable "Use DNSSEC" at Pi-hole DNS Settings and recheck the results at Cloudflare’s site: It should give now OK for DNSSEC.
A more reliable test would be to use e.g. https://www.dnscheck.tools/
FOLLOWUP Cloudlflared binary sometimes falls over and stops querying DNS
I’ve noticed a similar symptoms sometimes as reported in this reddit thread.
Mitigation would be, that if/when reinstalling Cloudflared, instead of using /etc/default/cloudflared, I can make myself a Cloudflared yaml config file to be used instead.
This is to be done obviously if not going with Unbound.
Unbound philosophy
- What is Unbound.
- Why Unbound.
- Advantages of unbound.
- Instead of Cloudflared, allows me to run my own recursive DNS server (answering the problem: whom can I trust. Not enabled for now as I’ve chosen to trust Cloudflare. However, Unbound has its merits.
- Since I will with Unbound be my own DNS-provider, I need to build high availability/fail over with second Raspberry Pi.
- If I later go with unbound, check link in reddit by user ukhaare.
NEXT Improve Unbound’s performance
- Inspect the Unbound configurations to improve its performance.
- If problems with installation, consult the reddit thread.
- If no problems, remove this and above.
NEXT After installation check the Cloudflare’s check site
- Check that Cloudlflare test gives with Firefox everything checked, and with iOS + VPN the top three checked (Encrypted SNI unchecked as not supported by mobile Safari).
NEXT Root-DNS
- Check if root-dns needs to be installed or will up-to-date root-dns package follow with Debian Unbound package.
NEXT Forwarding resolver vs. recursive resolver
- Double check after installation that unbound is not running as a forwarding resolver, but as recursive resolver.
NEXT Test Unbound
By doing:
$ dig google.com @127.0.0.1 -p 5353
For more information see this.
With cloudflare DNS doing $ dig google.com now returns:
$ dig google.com @127.0.0.1 -p 5353

; <<>> DiG 9.11.5-P4-5.1-Raspbian <<>> google.com @127.0.0.1 -p 5353
;; global options: +cmd
;; connection timed out; no servers could be reached
NEXT Test DNSSEC results before and after enabling Unbound
As per the test in this Reddit thread. The recommendation is to have the DNSSec of when using Unbound.
Preparation
NEXT Document the parts for Raspberry Pi Zero W and usb-kit, and how to put it together
- Acquire USB-dongle and Pi Zero W with SD-card and put the kit together.
- Install Pi Imager.
- With it, write minimal Rasbian OS (Raspberry Pi OS Lite) on the SD card.
- The Raspberry Pi OS images no longer have SSH enabled by default, but it’s easy to enable it; place a file named ssh (without any extension) onto the boot-partition of the SD card after you have written the disk image.
- Also enable the wireless for Raspberry Pi Zero W by creating to same boot partition a file called wpa_supplicant.conf with:
country=FI
ctrl_interface=DIR=/var/run/wpa_supplicant GROUP=netdev
update_config=1
network={
        ssid=YOUR_WIFI_NAME
        psk=YOUR_WIFI_PASSWORD
        key_mgmt=WPA-PSK
}
Raspberry Pi Zero W does not support 5 GHz, make sure you have 2.4 GHz enabled on the SSID that you are connecting to.
In wpa_supplicant.conf the psk=your-wifi-password is in clear text, but
the config’s password can be replaced by its hash by doing:
$ wpa_passphrase YOUR_WIFI_NAME YOUR_WIFI_PASSWORD. Then, in the config use the resulting hash instead,
e.g. psk=6a24edf1592aec4465271b7dcd204601b6e78df3186ce1a62a31f40ae9630702.
Notice the leading space in $ wpa_passphrase-command.
- Attach RPi Zero W to your router’s usb port.
- Change Raspberry’s IP to static by logging in to your router (in Asus RT-AC86U go to: LAN - DHCP Server: Enable Manual Assignment: Yes).
- Select raspberrypi from the client’s list and bind it to: 10.0.1.246.
- Once done, ssh into raspberry:
$ ssh pi@10.0.1.246
Ensure that pi user can log in also in the future SSH sessions. Add user pi to the ssh user group:
$ sudo adduser pi ssh
Leaving the default user pi, with the default password is a security risk. Add your own user, passwordless login is established later:
$ sudo adduser pyyhttu
Adding user `pyyhttu' ...
Adding new group `pyyhttu' (1002) ...
Adding new user `pyyhttu' (1001) with group `pyyhttu' ...
Creating home directory `/home/pyyhttu' ...
Copying files from `/etc/skel' ...
New password:
Retype new password:
passwd: password updated successfully
Changing the user information for pyyhttu
Enter the new value, or press ENTER for the default
        Full Name []: Tuomas Pyyhtiä
        Room Number []:
        Work Phone []:
        Home Phone []:
        Other []:
chfn: name with non-ASCII characters: 'Tuomas Pyyhtiä'
Is the information correct? [Y/n] Y
Check groups pi users is associated to:
$ groups
pi adm dialout cdrom sudo audio video plugdev games users input netdev ssh gpio i2c spi
Add user pyyhttu to all the same groups:
$ sudo usermod -a -G pi,adm,dialout,cdrom,sudo,audio,video,plugdev,games,users,input,netdev,ssh,gpio,i2c,spi pyyhttu

pyyhttu : pyyhttu pi adm dialout cdrom sudo audio video plugdev games users input netdev ssh spi i2c gpio
Change hostname. This is good practice to do in case we have multiple machines so we know which is which:
$ sudo nano /etc/hostname
Delete the old name and setup new name.
$ sudo nano /etc/hosts
Replace any occurrence of the existing computer name with your new one.
Reboot the system for changes to take effect:
$ sudo reboot
Wait couple of minutes for reboot to finish, then log in as the new user, and delete the old pi user:
$ ssh pyyhttu@10.0.1.246
$ sudo deluser pi
Removing user `pi' ...
Done.
Now we will allow our new user to execute sudo without providing a password, because password fatigue is a thing (at least for me). First, we delete the sudoers config for the user pi since we already deleted that user:
$ sudo rm /etc/sudoers.d/010_pi-nopasswd
Then we make a new file for the new user:
$ sudo nano /etc/sudoers.d/pyyhttu-nopasswd and with content:
pyyhttu ALL=(ALL) NOPASSWD: ALL
Change permission for that file:
$ sudo chmod 440 /etc/sudoers.d/pyyhttu-nopasswd
Pre-installation tasks on Raspberry Pi OS
NEXT Validate DNS latency and throughput performance
Before uninstalling Cloudflared and installing Unbound, test with a shell script the performance of the most popular DNS resolvers from your location with dnsperftest:
$ git clone --depth=1 https://github.com/cleanbrowsing/dnsperftest/
$ cd dnsperftest
$ bash ./dnstest.sh
$ bash ./dnstest.sh |sort -k 22 -n
                  test1   test2   test3   test4   test5   test6   test7   test8   test9   test10  Average
127.0.0.1         1 ms    18 ms   1 ms    1 ms    23 ms   1 ms    1 ms    1 ms    1 ms    1 ms      4.90
cloudflare        14 ms   14 ms   14 ms   31 ms   15 ms   14 ms   14 ms   14 ms   14 ms   15 ms     15.90
quad9             17 ms   18 ms   17 ms   18 ms   28 ms   43 ms   18 ms   18 ms   17 ms   18 ms     21.20
yandex            14 ms   14 ms   15 ms   15 ms   42 ms   73 ms   15 ms   14 ms   15 ms   40 ms     25.70
google            20 ms   19 ms   29 ms   29 ms   40 ms   65 ms   19 ms   29 ms   19 ms   29 ms     29.80
cleanbrowsing     35 ms   37 ms   35 ms   35 ms   35 ms   35 ms   35 ms   35 ms   35 ms   35 ms     35.20
adguard           36 ms   37 ms   35 ms   35 ms   35 ms   35 ms   35 ms   35 ms   36 ms   35 ms     35.40
comodo            36 ms   46 ms   37 ms   38 ms   36 ms   36 ms   36 ms   36 ms   36 ms   39 ms     37.60
norton            20 ms   20 ms   20 ms   20 ms   21 ms   20 ms   20 ms   20 ms   20 ms   211 ms    39.20
opendns           29 ms   29 ms   29 ms   49 ms   30 ms   145 ms  28 ms   48 ms   29 ms   29 ms     44.50
neustar           51 ms   48 ms   48 ms   55 ms   38 ms   38 ms   38 ms   48 ms   38 ms   52 ms     45.40
level3            47 ms   48 ms   46 ms   47 ms   47 ms   47 ms   47 ms   46 ms   47 ms   47 ms     46.90
freenom           20 ms   83 ms   20 ms   261 ms  201 ms  167 ms  52 ms   243 ms  20 ms   86 ms     115.30
Run the test couple of times to see the actual results, note them down, then proceed to uninstall Cloudflared:
Installation on Raspberry Pi OS
NEXT One guide to check
NEXT Settings for Merlin with unbound
See linked screenshot in here.
Maintenance
Troubleshooting
Observations and future direction
NEXT Update root.hints (think of cron)
- and installing more
up-to-date
Unbound.
Setup
with cron to update the root.hints every 6 months with
something like
$ wget https://www.internic.net/domain/named.root -O /var/lib/unbound/root.hints
NEXT Ensure after uninstalling Cloudflared that it is indeed uninstalled
- by doing
$ netstat -tunlpthat cloudflare is not showing activity on ports 44685 tcp and 54 tcp and udp, as per these instructions.
Monit and healthchecks.io philosophy
- Both are for system monitoring and automatic error recovery
- healthchecks.io is an open source, external service. Since it is external, it’s very light weight and we can rely our internet connectivity check with it without exposing service by doing firewall/port forwardings. The service is based on “Dead man’s switch” technique: if the healthchecks.io doesn’t receive a heartbeat from my rpi3, I know network is down, and I will receive both SMS and email notifications.
- Monit is an open source, lightweight (500 kb) system monitoring and automatic error recovery software that sits locally on rpi.
Preparation
Healthchecks.io
Register a hobbyist account and setup a project to get an unique url to ping against.
For Monit no specific preparation aside installation is needed.
Installation on Raspberry Pi OS
Healthchecks.io
Setup an automated ping:
$ crontab -e
And then in cronjob define a ping every second minute (as per crontab guru) by adding lines:
MAILTO=""
*/2 * * * * dig @127.0.0.1 pi.hole && curl -fsS --retry 3 "https://hc-ping.com/your-unique-url"
Note: Remember to add that MAILTO="". Otherwise cron attempts to send email via msmtp every other minute, which would spam your ~/msmtp.log with:
Feb 16 12:42:02 host=smtp.gmail.com tls=on auth=on user=yourname@gmail.com from=pi@raspberrypi recipients=pi smtpstatus=553 smtpmsg='553-5.1.3 The recipient address <pi> is not a valid RFC-5321 address. Learn more\n553-5.1.3 at\n553 5.1.3 https://support.google.com/mail/answer/6596 g19sm4764106ljm.135 - gsmtp' errormsg='recipient address pi not accepted by the server' exitcode=EX_DATAERR
See here for more info.
Monit
$ sudo aptitude install monit
Post-installation configuration tasks
Healthchecks.io
At https://healthchecks.io/checks/“your-unique-url”details schedule a period for two minutes and grace for 1 minute. Grace: If check is late, service waits 1 minute before sending me a notification.
Define notification method as email and SMS.
Monit
$ sudo nano /etc/monit/monitrc
Uncomment the following three lines first:
set httpd port 2812 and
use address localhost
allow localhost
Otherwise $ sudo monit status would give an error:
Cannot create socket to [localhost]:2812 -- Connection refused.
To monitor pihole-FTL, append at the end of monitrc:
1: check process pihole-FTL with pidfile /var/run/pihole-FTL.pid
Save changes. Check that monitrc is correct:
$ sudo monit -t
Then start monit:
$ sudo monit
Monit will detach from the terminal and run as a background process, i.e. as a daemon process. As a daemon, Monit runs in cycles. It monitors services, then goes to sleep for a configured period, then wakes up and starts monitoring again in an endless loop. If pihole-FTL is found to be down, it will be restarted automatically and findings are logged into /var/log/monit.log.
Note: Monit is run as root, because in case of error recovery, all programs executed by Monit will then be started with superuser privileges. This is wanted in our case, as we want to start /etc/init.d/pihole-FTL as a root.
If any changes are needed to be done to /etc/monit/monitrc, then make necessary modifications and do:
$ sudo monit -t && sudo service monit restart
DONE Setup email alerts
If there are finding, you’d like to receive an email. We’ll use gmail for sending those notifications.
Visit first your Google accounts security page and enable their 2-step verification.
Then visit your Google account
App passwords and generate a password for monit to use.
Lastly, do $ sudo nano /etc/monit/monitrc and define:
set alert where.alert-is-sent@domain.com not on { instance, action } # do not receive alerts when monit starts/stops

set mailserver smtp.gmail.com port 587
        username "your-gmail-address@gmail.com" password "your-generated-google-app-password-for-monit"
        using tls
        with timeout 30 seconds
Note: Deprecated method of setting up mail alert with Google was to enable “less secure apps”-setting, which was discontinued on May 30, 2022. Instead, now a 2-step verification is required, which also requires you to hand over to Google your phone number for SMS or call for added verification.
Maintenance
Troubleshooting
DONE Avoid false positives by Monit and healthchecks.io when rebooting or backing up rpi3
- Rebooting or backing up rpi3 with raspiBackup, will result in alert emails triggered by monit daemon with topics such as: “monit alert – Connection failed pihole-FTL” or “monit alert – Connection failed google.com”. The same emails are received from healthchecks.io.
- For monit, this is because monit starts to check services immediately after reboot, while the given services may not in fact be running yet.
- This can be resolved by editing /etc/monit/monitrc, define there with start delay 120 to give 2 minute delay before first check is triggered after reboot.
- For healthchecks.io this is more complicated, since it is a “dead man’s switch” based service. Upon investigating on solutions, such as Tronitor, controlled pausing can be done, but it would involve combining Tronitor with HealthChecks-Linux, which has dependency to Organizr setup relying on a reverse proxy, which then in turn requires installing and configuring NGINX… This too many dependencies, so we’ll live with healtcheck false positives for now: they’re fully predictable, scheduled to happen inside 3 min window, once a week when raspiBackup runs.
Observations and future direction
There are several alternative software for monitoring, alerting and recovery:
- smokeping
- Smokeping reddit thread.
- Netdata
- As described here and here.
- RPi-Monitor
- As mentioned here.
NEXT Network downtime stats
Use dockerized internet monitoring using Prometheus and Grafana. Do this if migrated from RPi3 over to RPi4.
PADD philosophy
- Shows Pi-hole status and various graphs. Can be put on a display and stand to router.
- Serves also as a change management and awareness instrument in household and for guests: "What’s this info screen? “Didn’t know that many ads are blocked” “Wait, can you spy with this my browsing habits?”
- PADD project is nowadays supported by the Pi-hole team.
- In case PADD does not cut it, there’s an alternative, PHAD.
Preparation
PADD was originally designed for 3.5" Adafruit display but I opted to go with cheaper a Waveshare 3.5" IPS screen. Available e.g. at vadelmapii. This display, (like a lot of the cheap displays) doesn’t have the circuits to control the backlight via software, so the screens stays always on, which if fine as impact to electricity consumption is negligible and the glow of the screen is not disturbing at all. The specs are available at Waveshare model B github pages.
Pre-installation tasks on Raspberry Pi OS
DONE Install the display
The Raspberry Pi 3 has an SPI (Serial Peripheral Interface) bus to which the display is connected. See Waveshare wiki for more detailed installation instructions.
DONE Enable console autologging and SPI
SPI is disabled by default, as is autologging which is needed for PADD display to emerge automatically after reboot. To enable both:
$ sudo raspi-config
Then select the following from the menu:
3 Boot Options
    B1 Desktop / CLI
        B2 Console Autologin

5 Interfacing Options
    P4 SPI
Installation on Raspberry Pi OS
As per this reddit thread.
DONE Install the drivers for Waveshare 3.5"
$ git clone https://github.com/waveshare/LCD-show.git && cd LCD-show/
$ chmod +x LCD35B-show-V2
$ ./LCD35B-show-V2
NEXT Alternative installation on Raspberry Pi OS Lite
Try next time with $ ./LCD35B-show-V2 lite
as instructed.
DONE Install PADD
$ cd ~ && wget -N https://raw.githubusercontent.com/pi-hole/PADD/master/padd.sh
$ chmod +x padd.sh
Set PADD to auto run by adding the following to the end of ~/.bashrc:
# Run PADD
# If we’re on the PiTFT screen (ssh is xterm)
if [ "$TERM" == "linux" ] ; then
  while :
    do
        ./padd.sh
        sleep 1
    done
fi
Then reboot:
$ sudo reboot
Post-installation configuration tasks
DONE Enable full screen usage and fonts
$ sudo dpkg-reconfigure console-setup
UTF-8 -> Guess optimal character set -> Terminus -> 8x14
NEXT Investigate statistics not showing with Pi-hole v6
Update broke something
Maintenance
- Subscribe to new releases with PADD versions RSS-feed.
- Once a new release is out, upgrade with:
$ cd ~ && wget -N https://raw.githubusercontent.com/pi-hole/PADD/master/padd.sh
Investigate how to enforce a seamless update to be visible on PADD display without issuing a reboot
Running $ ./padd.sh locally after a PADD update spawns a new PADD, but
not on the PADD display. Display still shows “Updates available”.
Also reloading the ~/.bashrc by doing $ source
~/.bashrc does not help either. The only way to get PADD running in the
display is to issue $ sudo reboot and let the .bashrc to handle the
update. Edit: I could try next to tweak term in .bashrc as per
issue 47 or issue $ ./padd.sh
> tty1 as in issue 134.
Update : This issue has resolved itself. Noticed when
updated pihole with $ pihole -up and the tft screen’s versions were
refreshed themselves to latest without reboot.
Troublehooting
Observations and future direction
raspiBackup philosophy
For backups we use something lightweight and proven, so bash scripted solution, like raspiBackup is ideal. raspiBackup ensures the backups are available for fast system restore when eventually rpi3’s SD-card wears out, resulting the DNS queries not resolving –> no internet connectivity.
Without raspiBackup, I’d need to redo in disaster recovery all the installation steps manually. Instead, I can speed up the recovery by just doing an install of a new barebone raspbian lite on a second SD card, boot it, install raspiBackup and do:
$ sudo raspiBackup.sh -d /dev/sda /location-of-my/backup
NEXT Measure how long restoration from USB takes
Backing up takes in total something like 30 minutes on a first run. Later, the incremental weekly runs will take approximately between 3-6 minutes.
DONE Investigate on backupping to NFS share on NAS, or offsite to Kapsi with sshfs
As an option to USB-stick backups, I could backup directly to my home NAS. Another option is to transfer the backup via sshfs to an offsite location, but local backups for now are preferred. This is because sshfs brings these additional complications:
- Network connection would be required. However, offsite backups for this system are not a must and restoring a backup when DNS queries are not resolving (Unbound being down) forms an added complexity.
- rsyncing to sshfs does not support hard linking, resulting in a slightly increased backup size.
- Also Permission errors would needed to be worked around.
- Taking offsite backup with rsync to local NFS/SSHFS on my NAS would take considerably more time than to a local usb-stick –> We want to keep the downtime as low as possible while backups run.
- Though unlikely, but basically admins of ssh hosting provider, have access via backups to my browsing history through /etc/pihole/pihole-FTL.db. This is a privacy concern.
- So local USB-stick attached to rpi3 it is.
Preparation
Attach an USB pen drive into rpi3.
Preinstallation tasks on Rasbian
I chose the cheapest 8 Gb USB thumb drive because I know the rpi3 backups will be ~2 GB in size and rotation of 3 versions means I need at least 7 GB of space. After attaching the USB, check its assigned device name:
$ sudo blkid -o list
device                                 fs_type       label          mount point                                UUID
---------------------------------------------------------------------------------------------------------------------------------------------------
/dev/mmcblk0p1                         vfat          boot           /boot                                      16D2-035F
/dev/mmcblk0p2                         ext4          rootfs         /                                          d065e631-6b9d-48c0-a8fe-e663b42828e0
/dev/sda1                              vfat          ADATA UFD      (not mounted)                              2999e9de-1aa2-43bb-b915-5d08d3301b91
/dev/mmcblk0                                                        (in use)
Leave the USB thumb drive as “not mounted” so that it can be formatted as ext4:
$ sudo mkfs.ext4 /dev/sda1
mke2fs 1.44.5 (15-Dec-2018)
/dev/sda1 contains a vfat file system labelled 'ADATA UFD'
Proceed anyway? (y,N) y
Creating filesystem with 1894393 4k blocks and 474208 inodes
Filesystem UUID: edcaf029-b0ab-421b-9d45-23ae1d7ea02a
Superblock backups stored on blocks:
  32768, 98304, 163840, 229376, 294912, 819200, 884736, 1605632

Allocating group tables: done
Writing inode tables: done
Creating journal (16384 blocks): done
Writing superblocks and filesystem accounting information: done
Ext4 is preferred as it supports hard linking (resulting in smaller copies when backupping with rsync).
DONE Mount the USB disk/thumb drive
I have the USB thumb drive labeled as /dev/sda1. To mount it to /backup:
$ sudo mkdir /backup
$ sudo mount /dev/sda1 /backup
To make sure usb is mounted after rpi3 is restarted, add an entry to fstab:
$ sudo nano /etc/fstab
UUID=edcaf029-b0ab-421b-9d45-23ae1d7ea02a /backup auto nosuid,nodev,nofail 0 0
UUID above is result of:
sudo blkid /dev/sda1 | awk -F'"' '{print $2}'
Installation on Raspberry Pi OS
Fetch the latest raspiBackup and execute its configuration UI:
$ cd ~ && curl -sSLO https://www.linux-tips-and-tricks.de/raspiBackupInstallUI.sh && sudo bash ./raspiBackupInstallUI.sh
Select:
 1: M2 Install components
 2:   I1 Install raspiBackup using a default configuration
 3:
 4: M3 Configure major options
 5:   C2 Backup path
 6:     /backup
 7:
 8:   C3 Backup versions
 9:     (*) Keep a maximum number of backups
10:         3
11:
12:   C4 Backup type
13:     (*) Backup with rsync and use hardlinks if possible
14:
15:   C5 Backup mode
16:     (*) Backup the two standard partitions
17:
18:   C6 Services to stop and start
19:     [*] 1: log2ram
20:     [*] 2: monit
21:     [*] 3: cron
22:     [*] 4: lighttpd
23:     [*] 5: cloudflared
24:     [*] 6: pihole-FTL
25:
26:   C7 Message verbosity
27:     (*) Display important messages only
28:
29:   C9 Regular backup
30:     R1 Enable regular backup
31:       R2 Weekday of regular backup
32:         (*) Saturday
33:       R3 Time of regular backup
34:         03:12
Additional note on above C6 Services to stop and start: The order matters. The most vital services, like cloudflared and pihole-FTL, must be stopped last, and started first. This is because if in case there’s a problem in stopping/starting services, the script fails, resulting in situation where most vital services (cloudflared and pihole-FTL) may not be started after they’ve been stopped.
Pi-hole related services are marked to be stopped/started. This way we ensure the backups are robust and no volatile, transactional data can jeopardize the integrity of the backups.
At the end of configuration UI, save configuration and cron settings for raspiBackup. Then choose Finish.
The configuration file is saved to /usr/local/etc/raspiBackup.conf and weekly backup by cron is saved to /etc/cron.d/raspiBackup. The actual executable backup script is run by cron every Saturday night at 03:12, and will be saved to /usr/local/bin/raspiBackup.sh. Once the raspiBackup has run, the logs are saved to /backup/raspberrypi/raspberrypi-rsync-backup-{date}-{time}/raspiBackup.log.
Run the backup for the first time manually to inspect everything is working:
$ sudo bash /usr/local/bin/raspiBackup.sh
--- RBK0009I: raspberrypi: raspiBackup.sh V0.6.4.3 (2d927a2) started at Sat 14 Dec 16:06:25 EET 2019.
--- RBK0128I: Using logfile /backup/raspberrypi/raspberrypi-rsync-backup-20191214-160625/raspiBackup.log.
--- RBK0116I: Using config file /usr/local/etc/raspiBackup.conf.
--- RBK0151I: Using backuppath /backup.
--- RBK0008I: Stopping services: 'systemctl stop pihole-FTL && systemctl stop dbus'.
Warning: Stopping dbus.service, but it can still be activated by:
  dbus.socket
--- RBK0081I: Creating backup of type rsync in /backup/raspberrypi/raspberrypi-rsync-backup-20191214-160625.
--- RBK0036I: Saving partition layout.
--- RBK0044I: Creating backup of boot partition in /backup/raspberrypi/raspberrypi-rsync-backup-20191214-160625/raspberrypi-backup.img.
42+1 records in
42+1 records out
44979712 bytes (45 MB, 43 MiB) copied, 1.90504 s, 23.6 MB/s
--- RBK0045I: Creating backup of partition layout in /backup/raspberrypi/raspberrypi-rsync-backup-20191214-160625/raspberrypi-backup.sfdisk.
--- RBK0046I: Creating backup of master boot record in /backup/raspberrypi/raspberrypi-rsync-backup-20191214-160625/raspberrypi-backup.mbr.
--- RBK0158I: Creating native rsync backup "/backup/raspberrypi/raspberrypi-rsync-backup-20191214-160625".
--- RBK0085I: Backup of type rsync started. Please be patient.
--- RBK0078I: Backup time: 00:16:35.
--- RBK0159I: 3 backups kept for rsync backup type.
--- RBK0007I: Starting services: 'systemctl start dbus && systemctl start pihole-FTL'.
--- RBK0033I: Please wait until cleanup has finished.
--- RBK0049I: Messages saved in /backup/raspberrypi/raspberrypi-rsync-backup-20191214-160625/raspiBackup.msg.
--- RBK0026I: Debug logfile saved in /backup/raspberrypi/raspberrypi-rsync-backup-20191214-160625/raspiBackup.log.
--- RBK0017I: Backup finished successfully.
--- RBK0010I: raspberrypi: raspiBackup.sh V0.6.4.3 (2d927a2) stopped at Sat 14 Dec 16:23:44 EET 2019.
First backup is created at /backup.
Two more separate backups are created weekly every Saturday morning at 03:12 AM. The oldest one will be overwritten. A full snapshot of 3 separate backups:
pi@raspberrypi:~ $ ls -al /backup/raspberrypi/
total 20
drwxr-xr-x  5 root root 4096 Jan 13 03:12 .
drwxr-xr-x  4 root root 4096 Jan 13 21:13 ..
drwxr-xr-x 22 root root 4096 Dec 14 03:22 raspberrypi-rsync-backup-20191214-031201
drwxr-xr-x 22 root root 4096 Dec 21 03:21 raspberrypi-rsync-backup-20191221-031201
drwxr-xr-x 22 root root 4096 Dec 28 03:17 raspberrypi-rsync-backup-20191228-031201
pi@raspberrypi:~ $
Newest is raspberrypi-rsync-backup-20191228-031201. Let’s restore that in order to test that backups are working.
Post-installation tasks
DONE Setup notification email
We’ll use gmail for this. First, install a Mail Transfer Agent, we’ll use
msmtp as it is easy to set up:
$ sudo aptitude install msmtp msmtp-mta
Configure it:
$ sudo nano /etc/msmtprc
# Gmail specifics
defaults
auth on
tls on
tls_certcheck off
logfile ~/msmtp.log

account        gmail
host           smtp.gmail.com
port           587

from           pi@raspberrypi
user           yourname@gmail.com
password       your-generated-google-app-password-for-mstmtp

# Default
account default : gmail
If you haven’t already, remember to visit Google’s security page, enable 2-step verification, and generate an app password for /etc/msmtprc. Otherwise Google rejects the mails to be sent.
Finally, test that mails are sent with:
$ echo 'test' | msmtp alert.destination@.mail.com
Configure raspiBackup to use this mail:
$ sudo nano /usr/local/etc/raspiBackup.conf
# email to send completion status
DEFAULT_EMAIL="alert.destination@mail.com"

# Sender emailadress used with ssmtp and msmtp
DEFAULT_SENDER_EMAIL="yourname@gmail.com"

# Send eMail and/or Telegram notification when backup starts
DEFAULT_NOTIFY_START=1

# Send email only in case of errors. Use with care !
DEFAULT_MAIL_ON_ERROR_ONLY=0
Test backup and mail sending with:
$ sudo bash /usr/local/bin/raspiBackup.sh -F
NEXT Encrypt msmtp gmail password with gpg
As per instructions here. OR, alternatively, store the gmail app password to system keyring so it isn’t needed in clear for in /etc/msmtprc. As per these instructions.
As moved it to msmtp.log_bak because of 350M log size and error:
Feb 16 12:42:02 host=smtp.gmail.com tls=on auth=on user=first.last@gmail.com from=pi@raspberrypi recipients=pi smtpstatus=553 smtpmsg='553-5.1.3 The recipient address <pi> is not a valid RFC-5321 address. Learn more\n553-5.1.3 at\n553 5.1.3 https://support.google.com/mail/answer/6596 g19sm4764106ljm.135 - gsmtp' errormsg='recipient address pi not accepted by the server' exitcode=EX_DATAERR
NEXT Testing the restoration of a backup on an SD-card
Attach to rpi3’s USB port an SD-card reader, with an SD-card in it. The SD-card doesn’t need to be emptied or formatted; the restore script handles that 13. Leave the USB-stick in place.
Check that Raspberry Pi OS identifies the new card we’re about to restore with a backup from the USB-stick:
$ fdisk -l | egrep "^Disk /|^/dev"
 1: pi@raspberrypi:~ $ sudo fdisk -l | egrep "^Disk /|^/dev"
 2: Disk /dev/ram0: 4 MiB, 4194304 bytes, 8192 sectors
 3: Disk /dev/ram1: 4 MiB, 4194304 bytes, 8192 sectors
 4: Disk /dev/ram2: 4 MiB, 4194304 bytes, 8192 sectors
 5: Disk /dev/ram3: 4 MiB, 4194304 bytes, 8192 sectors
 6: Disk /dev/ram4: 4 MiB, 4194304 bytes, 8192 sectors
 7: Disk /dev/ram5: 4 MiB, 4194304 bytes, 8192 sectors
 8: Disk /dev/ram6: 4 MiB, 4194304 bytes, 8192 sectors
 9: Disk /dev/ram7: 4 MiB, 4194304 bytes, 8192 sectors
10: Disk /dev/ram8: 4 MiB, 4194304 bytes, 8192 sectors
11: Disk /dev/ram9: 4 MiB, 4194304 bytes, 8192 sectors
12: Disk /dev/ram10: 4 MiB, 4194304 bytes, 8192 sectors
13: Disk /dev/ram11: 4 MiB, 4194304 bytes, 8192 sectors
14: Disk /dev/ram12: 4 MiB, 4194304 bytes, 8192 sectors
15: Disk /dev/ram13: 4 MiB, 4194304 bytes, 8192 sectors
16: Disk /dev/ram14: 4 MiB, 4194304 bytes, 8192 sectors
17: Disk /dev/ram15: 4 MiB, 4194304 bytes, 8192 sectors
18: Disk /dev/mmcblk0: 14.9 GiB, 15962472448 bytes, 31176704 sectors
19: /dev/mmcblk0p1       8192    96042    87851 42.9M  c W95 FAT32 (LBA)
20: /dev/mmcblk0p2      98304 31176703 31078400 14.8G 83 Linux
21: Disk /dev/sda: 7.2 GiB, 7759462400 bytes, 15155200 sectors
22: /dev/sda1  *       56 15155199 15155144  7.2G  c W95 FAT32 (LBA)
Where,
- mmcblk0: Old, internal SD card
- mmcblkp1: Old /boot partition
- mmcblkp2: Old /root partition
- dev/sda: Old, external usb-stick, mounted to /backup, containing the backup for restore
- : New, external SD-card, soon to be written with restored backup
To restore:
$ sudo raspiBackup.sh -d /dev/sda/backup/raspberrypi/raspberrypi-rsync-backup-20191228-031201/
More information at raspiBackup’s site.
Maintenance
Updating raspiBackup
Check the latest version you have:
$ sudo /usr/local/bin/raspiBackup.sh --version
Version: 0.6.5.1 CommitSHA: 9cc17fc CommitDate: 2020-10-31 CommitTime:
21:52:43
To update, do:
$ sudo bash /usr/local/bin/raspiBackup.sh -U
$ sudo bash /usr/local/bin/raspiBackup.sh -U
--- RBK0031I: Checking whether a new version of raspiBackup.sh is available.
--- RBK0190I: Upgrading raspiBackup.sh from version 0.6.5.1 to 0.6.6.
--- RBK0038I: Are you sure? y/N
y
--- RBK0057I: Downloading file raspiBackup.sh from https://www.linux-tips-and-tricks.de.
--- RBK0072I: /usr/local/bin/raspiBackup.sh updated from version 0.6.5.1 to version 0.6.6. Previous version saved as /usr/local/bin/raspiBackup.0.6.5.1.sh. Don't forget to test backup and restore with the new version now.
--- RBK0241I: Merging current configuration v0.1.3 with new configuration v0.1.4 into /usr/local/etc/raspiBackup.conf.merged.
--- RBK0248I: Added option DEFAULT_SMART_RECYCLE=0.
--- RBK0248I: Added option DEFAULT_SMART_RECYCLE_DRYRUN=1.
--- RBK0248I: Added option DEFAULT_SMART_RECYCLE_OPTIONS="7 4 12 1".
--- RBK0248I: Added option DEFAULT_TELEGRAM_TOKEN="".
--- RBK0248I: Added option DEFAULT_TELEGRAM_CHATID="".
--- RBK0248I: Added option DEFAULT_TELEGRAM_NOTIFICATIONS="F".
--- RBK0248I: Added option DEFAULT_NOTIFY_START=0.
--- RBK0248I: Added option DEFAULT_COLORING="CM".
--- RBK0248I: Added option DEFAULT_EMAIL_COLORING="SUBJECT".
--- RBK0248I: Added option DEFAULT_DYNAMIC_MOUNT="".
--- RBK0249I: Deleted option DEFAULT_APPEND_LOG=0.
--- RBK0249I: Deleted option DEFAULT_APPEND_LOG_OPTION="-a".
--- RBK0249I: Deleted option DEFAULT_RESIZE_ROOTFS=1.
--- RBK0243I: Configuration merge finished successfullly but not activated.
!!! RBK0245W: Backup current configuration in /usr/local/etc/raspiBackup.conf.bak and activate updated configuration? y/N y
--- RBK0240I: Saving current configuration /usr/local/etc/raspiBackup.conf to /usr/local/etc/raspiBackup.conf.bak.
--- RBK0244I: Merged configuration /usr/local/etc/raspiBackup.conf.merged copied to /usr/local/etc/raspiBackup.conf and activated.
Note: Graphical installer /usr/local/bin/raspiBackupInstallUI.sh needs to be updated
separately by running $ sudo raspiBackupInstallUI.sh and navigating to M5
Update components - P2 Update raspiBackupInstallUI.sh.

To be notified of new updates, subscribe to raspiBackup releases rss-feed.
Troubleshooting
DONE Updating raspiBackupInstallUI.sh errors out with Syntax error: newline unexpected
After running $ sudo raspiBackupInstallUI.sh and selecting P2 UpdateraspiBackupInstallUI.sh, script exits and update passes, but then
invoking the script again with $ sudo raspiBackupInstallUI.sh gives an
error:
/usr/local/bin/raspiBackupInstallUI.sh: 2:/usr/local/bin/raspiBackupInstallUI.sh: Syntax error: newline unexpected
In this case reinstall the update script with:
$ curl -sLO https://www.linux-tips-and-tricks.de/raspiBackupInstallUI.sh
$ sudo mv raspiBackupInstallUI.sh /usr/local/bin
$ sudo chmod +x /usr/local/bin/raspiBackupInstallUI.sh
$ sudo chown root.root /usr/local/bin/raspiBackupInstallUI.sh
Verify the script now functions with the newest version:
$ sudo /usr/local/bin/raspiBackupInstallUI.sh -h
raspiBackupInstallUI.sh 0.4.3.4, 2020-11-04/22:18:13 - 6c4a442
raspiBackupInstallUI.sh ( -i [-e]? | -u | -U ) [-d]?
-d: enable debug mode
-e: unattended (re)install of raspiBackup extensions
-i: unattended (re)install of raspiBackup
-U: unattended update of raspiBackupInstallUI.sh
-u: unattended uninstall of raspiBackup
DONE raspiBackup does not clear old backup versions at /backup/raspberrypi/
- Seemed to be because of issue 443. Fixed in latest commits so updating my script to latest with:
$ sudo bash /usr/local/bin/raspiBackup.sh -U -S (-S flag retrieves the latest commits) fixed the issue.
DONE raspiBackup subject line contains MIME-Version
As reported in issue 264.
Fixed with a workaround by disabling mail colors in /usr/local/etc/raspiBackup.conf:
# Colorize console output (C) and/or email (M)
DEFAULT_COLORING="C"
Observations and future direction
Footnotes:
Wikipedia article that elaborates on this.
There are several blocklists to choose from.
With Pi-Hole use scenario, best SD-cards have a high randIO rating. Meaning, a card that tolerates lots of random read and write.
Raspberry shows under “Network Map Clients List” with “Manual” IP, not “Static”, but that should be the same. Manual vs. static IP explained.
For mode information on maintaining system with apt-listchanges and
apt-listbugs: What
are some best practices for testing/sid users
Also see: How
to avoid breaking debian unstable
The hourly saving of logs does not nullify the real time logging, because as said, the logs are still there, but stored into RAM memory, which is dumped hourly to SD-card.
Note that Conditional Forwarding does not work for all routers and may lead to slower performance due to DNS looping. This manifests itself as memory and log file space consumption.
rpi can have a hardware based realtime clock installed on it RTC shim / hat, see e.g. this article.
Instead of installing WireGuard and routing VPN-traffic through home connection, one can also bypass selfhosted WireGuard completely, and go for iOS client based Blokada.
Additional WireGuard guides in github.
Alternative speedtest service is Librespeed speedtest, which can also be selfhosted.
See Pi-hole documentation on interfaces.
Use the same make and model (rpi3), and the same operating system for restore which was used to create the backup.